
*** UPDATE *** We are proud to announce the completion of the Steamy Kitchen Palace Chicken Coop Construction Drawings. A 32 Page PDF showing every detail and measurement needed to recreate this chicken coop. It was professionally created by a licensed architect and comes complete with Bill of Material and an updated 3D model. There is more information about the plans at the end of the article. We will leave the original SketchUp file link up if you would like to work from just the model I used to create the coop. The plans are being made available by our good friends at Happy For A Living.

by Scott
When Jaden brought home 5 fluffy new friends in July of last year, I knew a chicken coop was in our future. I wanted to design and build it myself as a fun exciting project.
When I first started doing research on our new coop I spent a great deal of time on Back Yard Chickens looking for ideas and suggestions. We owe a great deal of credit to the people who were willing to share their coop photos. All of them gave me tips, ideas, and inspiration. We are grateful for their willingness to share their passion and work. Our girls would not have such a lovely home if it were not for the sharing of these people!
In that spirit, I wanted to create a pictorial showing how we made our coop. If you have any questions on how something was done, please ask and I will try to answer to the best of my ability.
Free Chicken Coop Plan for The Palace
Design Phase
We wanted to make sure our coop met the following requirements:
- It had to be aesthetically appealing as it would be highly visible.
- Easy cleaning and maintenance (including being able to stand inside & have easy access to clean coop).
- Sturdy to handle those occasional tropical storm conditions here in Florida.
- Designed to use Deep Litter Method in coop and run.
- Resistant to Summer Rain Flooding that occurs in that part of the yard.
- Good ventilation and air movement.
- With adequate room for 5-7 hens (I figured we would be adding one or two more hens later)
I probably spent the better part of two weeks of late night web surfing to gather ideas and develop a plan of attack. I checked, double checked and cross referenced everything from space per bird requirements, Deep Litter Method (DLM), nesting box sizes, roost length, building codes, roofing solutions, predator proofing, waterproofing, drainage ideas, working with concrete, to using explosive nailers. I must admit the internet is a wonderful tool.
At this point I would like to add my *** Disclaimer ***: I am not an architect nor structural engineer. They have not been approved to meet certain hurricane, earthquake, volcanic, flooding, nuclear blast or other natural disaster sized forces. I am a computer engineer, trained at West Point Military Academy (which means I’m obsessively detailed and thorough.) Our chicken coop has passed all local inspections. Please note that no chicken was harmed during the making of this coop and all testing was done in very controlled manner 🙂
I spent a fair amount of time looking for plans online. It seemed I was unable to located any free plans that seemed to meet what we needed. So I decided to use Google’s 3D modeling tool SketchUp to create a working model for our coop. It allowed me to spin the diagram in any direction and adjust it as I saw fit. It did take a while to get used to it, but the time spent in the learning curve was more than worth it during the construction phase. I can send you two files from SketchUp with the plans for the coop if you are interested. The first is the rough framing, while the second is the finished framing after the hardware cloth is installed.
For the free SketchUp plans – RIGHT CLICK here for a zip file and “Save link as”
*** Special Note *** – In the SketchUp files, please note all lumber is depicted as true 2 inch by 4 inch. In reality, lumber from a mill is rough cut to 2×4 and then finished down to a smaller size. Usually 1.5″ x 3.25″ inches. That means you will need to adjust lengths of the 2×4’s to compensate.
You must download and install Google’s SketchUp program for these files to work. Google SketchUp is a free program that you can download (make sure you download the correct file for your operation system (Mac or Windows). It’s a pretty complicated program to use if you are not used to 3D applications.
If you’re not familiar with 3D applications, we have hired a professional to convert the SketchUp files into a nice, neat, easy to read PDF. Get the plans here!
Designing the Chicken Coop

I decided on the following features for our coop:
- 5 – 7 egg laying hens (standard size)
- 10 sq ft of run space per bird
- 3 sq ft of coop space per bird
- 1 ft of roost rail per bird
- 1 nesting box per 3 birds
- sloped coop and nesting box floors for water drainage during clean outs
- sloped metal over wood roof that added stability as well as way to gather rain water.
- minimum 6 ft height so I could stand up inside.
- strength of construction to ensure durability and stability
- easy access doors for cleaning as well as egg harvesting
- raised foundation to help prevent flooding
- 1/2″ hardware cloth used for screening
The entire structure is 12 ft by 6 ft. The coop measures 4 ft by 6 ft. The roof has a 1 ft overhang on all sides which gives us a 14 ft by 8 ft roof. The coop floor is approximately 30 inches above the run floor.
Chicken Coop Foundation Phase
One of the biggest concerns I had was dealing with the potential flooding of the area surrounding the chicken coop. This past summer we had so much rain that the ground in the area became completely saturated. The ground was like a sponge and when you walked on it, you would sink an inch and water would flow around your boots. There was a concrete pad already poured where we wanted to build the coop, but we wanted to use that for a future shed or work area for the garden that is part of the same area. I made the decision to pour a footer attached to the existing pad to build the coop up on. This would raise the coop about 6 inches higher leaving room for drainage, even if the ground became completely saturated again.

It’s important during this step to make sure everything is square and level. After framing the footer I added rebar and drainage stones to help facilitate water flowing out of the chicken coop.

I mixed and poured the concrete using a mixer rented from Home Depot. If you’re wondering, the footer was 6 feet wide by 12 feet long and 6 inches across. The 24 linear feet took over 1/2 ton of concrete. Mix it with a mixer, or better yet, call a concrete company and have them deliver your required concrete premixed. Your back will thank you!

When I went to remove the forms, I noticed this in the concrete.

It seems Jaden let the chickens out some time after I poured the cement before it had cured sufficiently. I found the guilty party not to far away with her concrete shoes. Even to this day she is claiming her innocence and blames it on Chicken Little.

Before I poured the concrete I had inserted a four foot section pvc pipe on the lowest part of the coop. I cut, drilled and assembled PVC pipe to act as a drain if a sever downpour occurred. The holes are about 2 inches apart.

Another view of drainage system.

I ordered a 1/2 cubic yard of gravel and a cubic yard of sand from a local aggregate company. They were kind enough to deliver it right to my driveway much cheaper than buying a huge number of bags at the local home improvement store (not to mention the numerous trips it would have taken to carry the weight). I used the gravel to build up the floor of the coop. Later it will be covered with weed prevention cloth and then the sand will be added. This put the “floor” of the coop at least six inches higher than the surrounding ground. Hopefully this will keep the ladies’ feet dry.

Chicken Coop Framing Phase
Framing was new to me. I had a general idea on how things were supposed to go, but no real framing experience. I did spend some time looking for nailing requirements and and how best to secure the coop to the foundation. During this research I came across a great deal of information on basic framing. I printed out images from the sketch-up and used them as a reference to cut all of the framing pieces. After cutting, the family pitched in to help pre-stain all the pieces. We used a good water sealant stain and made sure we had good coverage on all the pieces, especially the ones that would have direct contact with the concrete.
I was fortunate enough to have family help stain the wood.

The process of cutting and staining all the pieces took much longer than anticipated. Painting or staining after assembly might have been easier and faster. Might be something to consider.
Framing took several days. Keep in mind if you are working by yourself use numerous clamps and braces to keep everything where it is supposed to be.

After getting the initial walls and roof beams up, I used a powder activated nailer to secure the kick plates to the concrete putting a fastener about every foot. Probably more than I needed, but I was enjoying the process so a few extra fasteners never hurt. I had to vary the loads of powder if I was nailing into the concrete pad or the footer.

And another view from the opposite side. From this angle it is a little easier to see the coop floor is tilted towards the side where the door will go.

I cut the coop floor from plywood and then started installing the 1/2″ hardware cloth.

It’s a pretty straight forward job of measuring, cutting and then installing the hardware cloth. I used an automatic stapler to secure the cloth to the framing. Later it will be sandwiched between the framing and the finish framing piece. An automatic staple gun is an absolute must during this phase.

I then installed the finish framing pieces that were designed to hold the cloth in place.

These pieces help secure the cloth on the inside of the coop.

I also installed the roof sheathing at this time to help keep some of the rain out. I left some of the finish framing pieces off till after installing the walls.

Framed out where the hen door was going.

And also the nesting boxes. The boxes themselves measure about 14 inches across, 16 inches tall and 12 inches deep. You can’t tell from the picture, but the floor of the nesting boxes is tilted towards the coop so water will flow out when cleaning. Notice the gap between floor of nesting box and the retaining board. You can also see the sloped coop floor pretty well in this picture. Also note that the nesting boxes are up about 6 inches off the floor to allow for the DLM.

Chicken Coop General Construction Phase
I picked up some very inexpensive vinyl flooring tiles from the local home improvement store. They were quick and easy to install and hopefully will help when cleaning out the coop.

Here is a picture of the removable stopper blocks.

And with them removed as if we were cleaning the coop out.

Built and mounted the main access door.

Other side of door.

I also built the access ramp.

It is secured using four eye bolts. The two on the bottom of the ramp have been cut using a hack saw to make hooks. The ramp can be removed and washed off with a hose. I didn’t install this till after I had the walls up on the coop, but I wanted to show it to you here.

Building the Coop Phase
The coop walls are built with simple siding sheets found at Lowes. They are shiplap boards that have an overlapping edge on them. I decided to build the panel, install them on the coop, trim and then stain the boards. Most of the trim pieces are 1 x 4 strip. I choose the strip over the normal 1 x 4 boards because they were much cheaper and already had the rounded edge. Surprisingly the strip boards actually had very few knots and were fairly straight. I had to cut two of the finish framing pieces to install the ventilation and siding above the coop door. I had forgotten the roof would hang down and interfere with the door opening. Using a skill saw set at the appropriate depth this wasn’t a major issue.

I also secured a 2×4 to act as my door stop as well as my support for the siding. The ventilation holes were created using a 2″ hole saw and covered with 1/2″ hardware cloth.

Next, I built the coop door and trimmed it.

Here is a close up of the back of the door showing the hardware cloth sandwiched between siding and trim pieces.

Then installed it on the coop.

Then the same process for the rest of the sides.

Back coop wall installed.

Nesting box side.

Chicken ramp side wall.

Stained inside and out. Seems Nathan decided he liked to pretend he was a hen checking out the new coop.

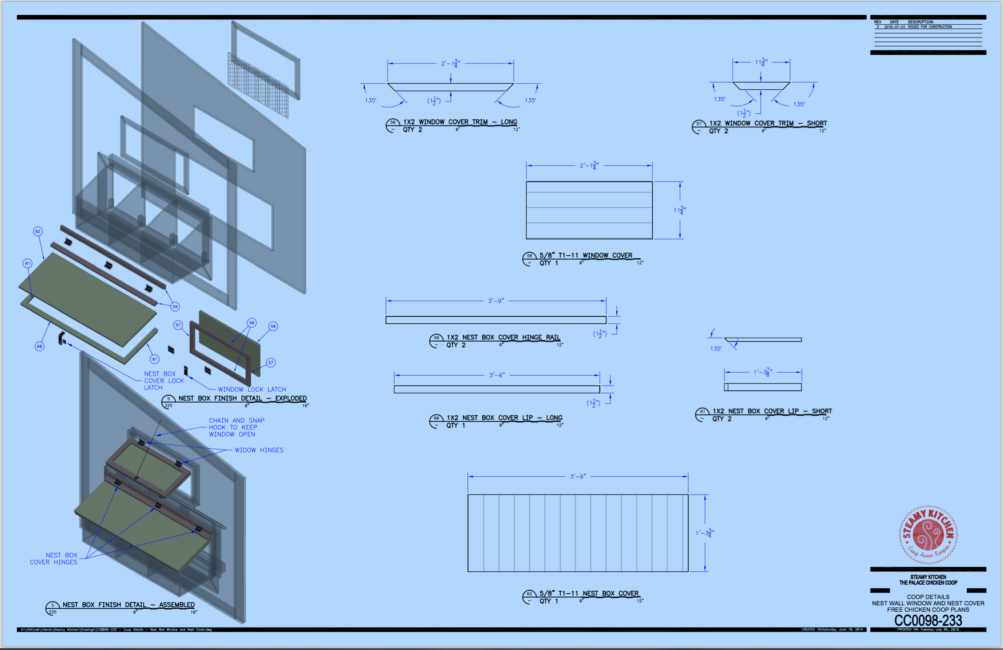
Built the nesting box cover out of siding and some trim pieces I had laying around. I used an extra trim piece that will attach to the wall to create an overhang. Hopefully this will help reduce or eliminate water leaking into the coop from the nesting boxes. I will also put weather sealing around the rim to help make it water tight. There is also a lip on the bottom of the siding around the nesting boxes, but it might be hard to see in this picture.

Installed the missing finish framing pieces under the coop. This is a good view of where the concrete pad and footing are connected. Using the pre-existing pad helped reduce the amount of concrete in this project. The coop height also gives the chicken’s adequate headroom.

Chicken Coop Run Floor Phase
I put weed block cloth down to prevent weeds from growing up through the floor and more importantly, preventing the sand from washing down through the rocks. It will also allow water to seep through into the drainage system.

Put sand around the edges to hold it in place.

Then I moved this cubic yard of sand…

Into the coop. In the end I think I ended up with a little less than 6 inches of base sand on top of a four inch rock base.

Chicken Coop Roof Phase
Built and painted the gutter. At fourteen feet, the gutter was going to be multiple pieces. It was pretty straight forward as far as assembly goes, but it did give me reason to pick up a pop-rivet tool. I always enjoy picking up new tools! 

Installed it on the edge of the coop. I debated about building wedges to make the gutter parallel with the ground, but decided the 10 degree difference between roof and ground could be accounted for in the mounting. When I mounted the gutter to the coop I realized the lower end would be below the drip edge from the roof. I cut a piece of aluminum from the unused portion of gutter and painted it. It was installed overlapping the back of the gutter but will be under the drip edge from the roof.

Then I papered the roof and put down the 1×4 stripping to give breathing room.

Following a suggestion from this post on how to install a metal roof, I laid the metal roof out on the lawn to determine where the ribs would be in comparison to where the edge would be. I trimmed the roof on both side edges to ensure I would not have a rib where the edging would be.

Then installed the roofing on the coop. If you have never installed any type of roofing, plan for some extra time in this step. Be careful and think safety. Winds can be dangerous when handling these large metal sheets and the edges are very sharp.

Chicken Coop Finishing Details
The final stretch was finishing the nesting boxes and installing the roost bar. The chickens seemed to enjoy the temporary bar I was using for their roost, so I rounded the edges a little and left it unstained. No real reason why, I just liked it that way. I also think it was easier for the chickens to see. Seems they were having trouble accurately judging a stained one I had in there during hours of low light.
I used some trim pieces to give the nesting boxes a little more cozy feel. I am pretty sure the girls didn’t care one way or the other, but I like the look of them with the trim in place.

Here’s a view from the outside showing the trim pieces. My wife and kids added the fake wooden eggs to give the girls a hint of what they are supposed to do and where to do it.

Built and installed the coop door. The rope is pulled from the front to open the door and is hooked on to a cleat to keep it open. We leave it open most of the time, closing it during very windy or cold nights. I used some furniture slides on the door inside the track to help it move easily.

Close up of the door. When the door is closed it does extend a bit below the door opening to help prevent little racoon fingers from trying to open the door (in theory at least).

Here is the cleat for holding the door open.

We also hung a little child’s rake on the outside and use this to help turn under the poop or spread new wood chips in the coop. Very handy!

We moved the girls in and they seem very happy.

You can read about our first egg-perience here: Our First Egg.
And here is one of the recipes she used our fresh eggs in: Crepes with Salted Lemon Butter Caramel.
Lessons Learned from Building Chicken Coop
- Double check length of your lumber, especially the longer pieces. The 12 foot and 14 foot pieces I got from the store were longer by almost two inches. Without catching this, the coop would not have fit on the footer.
- When squaring the footer use either the 3-4-5 triangle method or diagonal corner method. Both of these methods assume that your opposite sides are equal in length for the rectangle to be square.
- Getting help framing is always nice. Having an extra pair of hands makes holding things in place much easier. If you are going it alone, then don’t hesitating in generous use of clamps and temporary alignment guides.
- The chicken coop ramp’s rungs are made of 1×2 on 6 inch centers. The girls seem to skate down between rungs, maybe a little closer together would have been better. They don’t seem to mind and go in and out the coop all the time. I’ll keep an eye on this to see if it becomes an issue. If you are moving your chickens when they are smaller, then build a ramp with closer rungs. After they mature you can swap out the ramps.
- I did add a removable board across the coop door to hold the shavings in when we open the door. It’s held in place by a piece of 1×2 on each side of the coop and it slides up for removal.
- Don’t think that because someone works at a big box home supply store they know everything you need. I ran into issues when ordering the roof for the coop. I went in and asked their special projects desk person for assistance in ordering everything I needed for an 8 x 14 foot metal roof. After I picked up all the parts I went online to the manufactures web site to see if they had any special instructions. After finding their installation guide, I quickly realized I was missing half the parts required to complete the roof they way I had explained it to the salesperson. It’s better to take some time and research exactly what you will need before you go to the store than it is having to wait 2 more weeks to get the rest of the parts delivered.
- Pre-drilling holes for nails and screws makes things much easier when you are working on top of a ladder.
- If you have young children like we do who want to collect eggs from the nesting boxes, then top opening boxes may not be the best bet. We had to put a step stool out by the coop so the kids could open the boxes and reach the eggs. I wouldn’t lower the boxes any, but I might consider making a back door instead of the top opening. Just a thought.
- I love the slanting floors of the nesting boxes and the coop. Remember to factor that slope in when building your walls. Double check all your measurements and calculations. Also installing the walls is another great time to ask for a little assistance.
I’m really happy how things are going so far. I’ll keep you posted as we progress.
Want to see what people have created from our plans?
Check out these amazing coops! I am blown away by how people have adapted these simple plans into their own works of art! Click the photo below for a quick tour of these variations!

Would You Like A Copy Of Our New Chicken Coop Plans PDF?
We are happy to announce we have had our 3D SketchUp plans professionally converted to a very detailed 32 page PDF so you can re-create this coop for yourself. I must admit, I wish I had these plans when I started, things would have been a lot easier!
Included in the set are:
- 32 page PDF with over a 100 detailed drawings
- Complete Bill of Materials with Estimated Cost
- Bill of Materials Spreadsheet to track your expenses
- Revamped 3D model that you can show your significant other what it will look like!
This is a sample page from the plans so you can see just how detailed they are.
We are very happy with how these construction plans turned out and we hope they will be well used by everyone. The plans will more than pay for themselves in just the time saved by using them. I spent many hours creating the original model and even more time taking measurements from the model and then going to the workshop to cut the pieces. This set of plans eliminates that for you.
The link below will take you to our good friends at Happy For A Living, where you can use their secure checkout platform. Fill out the information and you will get instant access to all the files for the coop.
BUY THE STEAMY KITCHEN CHICKEN COOP PLANS
Thank you for your support.
Of course, if you would rather have the original SketchUp files, they are available below free of charge.
Free Chicken Coop Plan: Download the Google SketchUp Files
You must download and install Google’s SketchUp program for these files to work. Google SketchUp is a free program that you can download (make sure you download the correct file for your operation system (Mac or Windows). Just note that it’s a complicated program to use if you are unfamiliar with 3D modeling software.
For the free SketchUp plans – RIGHT CLICK here for a zip file and “Save link as”


Looks great! Can’t wait to get started.
Hey, I can’t figure out how you got the hardware cloth between the studs and the horizontal pieces at the top and bottom. Do I have to loosen the studs and tuck the hardware cloth in between? Just to be clear, I’m talking about initially attaching the hardware cloth, before adding the hold downs. I know the hold downs sandwich the hardware cloth.
Like many here I was it the farm store and walked out with 4 chicks. Thought I’d buy a $500 coop on line but size and quality were not acceptable. Found and purchased your plans, then decided to marry the palace coop to the back of an existing shed. The shed is on pier blocks so I just put three across the front. I extended the roof out 6 feet and the shed is 12 ft with 18 inch overhang each end. The angle of the rafters and height of the roof changed many of the dimensions and the ventilation and opening windows were change due to my climate and high winds. The plans were still very helpful and the shed saved me $s. I had some plywood, 2x4s but purchased over 50% wood. With new shingles including the shed $1300. Thanks for the detailed plans.
Great plan – would appreciate receiving a copy of the Sketchup file as the zip seems to be corrupted.
Excluding the foundation, sand, vinyl, and some fasteners (common nails), the current materials cost is $3K (I cross-shopped Menard’s, Home Depot, and Lowe’s). Walmart’s eggs are $0.25/ea; so with layers that make ~180 eggs/year, I need to house 8 chickens for 9 years to recover the materials costs. I still think it’s worth the investment if you live in a nice neighborhood and don’t have a fenced yard to obscure your feathered friends. It’s also my largest project and I’m looking forward to learning new skills.
You’re in the same boat I’m in! IS IT WORTH IT to build and pay all this money? Will I even like chickens in a year? I was seriously looking at Carolina Coops and love them, but way too expensive. For the same money (or slightly less), I can have a larger run, etc…and still have the deep layer method. Did you get your built? Pictures? I may tweak this plan with a different one I’ve seen (JFlemming on youtube), but this plan has a great vent system. Very curious to see if it does the trick.
Eggactly. Is the cost of the coop worth it? The price of the eggs that can be purchased at Walmart for $2.43 (for 18 count, 02/11/2023 pricing on the west coast of Oregon. And no, we arent paying $7.00 a dozen like San Francisco. So, back to the cost of the coop…The price of lumber, materials, and especially the hardware cloth to keep out rodents is just tooo “egg-stravegant”.
I know the cost will seem high, but in the end knowing where my eggs are coming from will be worth it. Sometimes you need to think out-side the box. I’ve heard of people creating a coop from old wood pallets. I’m going to use some boards from our old deck we took down and also I’ve been collecting good wood pallets of all sizes. There is always someone trying to get rid of left over building materials. So what I don’t have I’ll buy. I’ll design it to utilitze what size materials I have for most of the coop and buy more materials for the run. I’m making notes and sketching out the size and layout now. All these tips will hopefully help me build a coop/run to house my new chickens. So excited!!! Thanks for the details on your build and also especially thank you for the tips in the end.
I’m trying to use my original link to check for plan updates but I’m blocked by a pop up from Clickfunnels.com which seems to think that I own the site. Can you help?
The orientation of the roost, under roost space, and aviary shown in this design is very functional and should be considered the norm for any coop. I have the same orientation done in a style that matches my house architecture. Recommended upgrade is three side solid enclosure of the space under the roost to provide vented but sheltered feeding area for bad weather. Make one side swing out for easy food and water access. Build clear plastic storm panels to cover the aviary openings if you live in cold winter climates, blocking the wind with hen body heat will keep the aviary comfortable in the winter. Last suggestion is a cooptender automatic door if you want to allow some free ranging or a larger fenced but minimal security day yard. Once you start adding coop features you will look back and admire what you have created! I have a matching architecture and painted coop with full concrete foundation and slab, R13 roost walls, working casement windows with 1/4″ interior pretitor wire mess screens, AC power, coop porch light wired to the house porch switch, water heater unit for winter, flat heater mounted behind roosting bars for winter, reptilian heater bulb in roost with home thermostat (55 degrees), multiple lights on a timer for dark winter months, Cooptener door to allow access to day yard with external predator electric wire. The hens live as well as we do!
Very nice plans. Totally worth the fee. Had no problems with any of the files. Lumber prices change so costs are different, but close enough to call accurate. A question and a comment:
Section G – How is the roof rafter supported to the structure? Is it only supported by the front and rear cross braces from Sections F & H?
Section H – The plans show the roof rafter to the inside of the verticals, but it actually has to be to the outside (as your photos show above) in order to maintain plumb nesting box supports.
I tried Downloading the Sketch Up plans. It is giving me a Failed – Forbidden message. is the link locked? I use Sketch Up all the time, never had an issue with a link like this. Can you maybe email me the .skp file?
Instead of Saving as link, click on the link and it will direct you to dropbox. Then download the file directly from there!
I had the same issue come up, hope that helps : )
Hi – I just purchased your plans. While I was able to open the Adobe files/plans, the SKP file would not open. Is there anything in the SKP file that’s not already included in the Adobe document? Just wondering if I need to figure out how to open the SKP file if there is additional information in there I will need.
May you please email me the plans. Thank you
Hi, the download link is not working, could you be able to send it through email?
Thanks,
I am currently building a Palace Coop to your drawings. I have the following questions.
1) The vertical dimensions on the cross sections are shown from the foundation level. I suggest that they should be from the top of the 4 x 2 sole plate.
2) one of the roof plates is shown as 4ft 2ins wide. We only have 4ft wide sheets available. ( I am reducing one of the rafter spacings above the door by 2ins to compemsate.
Ken,
I agree with your first comment. This is one of a couple spots where the the reference point for the ground is not correct and should begin somewhere above that point. My plans do not show how exactly to secure the roof to the structure. What kind of braces are being utilized to fasten it all together? WHile most of the plans provide a good amount of detail, until you actually get to the point that the piece is ready to mount, that’s where I’m seeing some gaps in the plans. Just wondering if you could shed some light on what you did. The plans seem incomplete, from my perspective and I downloaded the 32 page file after purchase.
Just purchased the plans. I had no problems loading the file into SketchUp. Everything looks complete and all should be very useful. I plan to use a lot of reclaimed lumber I’ve been saving over the years, which will likely result in some deviations from the plans. Because I’m in cold New England, I may use header beams to support the roof rafters in anticipation of a heavy snow load. I also may construct the wall frames as separate modules and assemble them on site. That way I can work on a flat surface and better control squareness. Maybe I missed it, but in addition to the materials list, it would be useful to have a required tools list. This may be the project that gets me to buy a compressor and nail gun? Thanks for the plans at an affordable price. Good stuff!
I cant get the plans to download???
Hi there,
Love the coop! I was wondering if you could please email me the free zip file?
Thank you! 🙂
What year was the supplies list compiled? Our lumber prices are more than double the cost listed in the plans, I’m trying to figure out if that is because we live in different places or because it was years ago and prices have gone up a lot. Cost to build this now is a lot higher than listed. any ideas on finding cheaper supplies to more closely match the theoretical pricing listed?
Hi! I purchased the plans but can’t get the link to open up and work so i can view them. Please help!
I’m not able to open the zip files that have the SketchUp plans. Can you please email them directly to me? THANK YOU!!!
Looks like a great coop! What is the overall footprint? Width x Depth, not including the extended nesting box.
Just found the specs. I should have read more closely. Do you think it would be difficult to scale the plans down to a 7′ by 4′ total size?
Zip file not working. Would you please email me the zip file? Love the pictures and the design. Thank you!!!
I second this. the Zip file is not working anymore.
I cant download zip file either can you send . ?
I bought the plans but never downloaded them what’s my next step to download them
Did you get it in an email? I would love it as well
There are many advantages to owning your own chickens. Farm fresh eggs are healthier, tastier, and readily available from your own back yard. Meat birds are fast growing, take little space to raise and are fairly inexpensive for the resulting outcome in food production. Raising your own chickens means you get to decide what goes into the making of the final product.
That is a beautifully-built and beautiful-looking chicken coop! Thank you so much for the time and effort you put in to providing your step-by-step process, lovely clear photos, and even helpful hints and “learnings from beyond the build”. I’ve just spent several hours studying every one of your comments and photos, and it is already clear to me how to build this.
I appreciate the generosity of your free lesson, whereas all the other comments just seem to be demanding and complaining. People are strange. No good deed goes unpunished, they say. I hope my appreciation counteracts some of that. I’m not asking anything more of you; you’ve given enough already. Thank you.
Same as others, the sketchup says I am unable to view.
I purchased this plan and have photos I would love to share, we upgraded this spring to 20 chickens and simply expanded the coop. I went back to look at the plans and I’m locked out. It’s there any way to fix this?
I would love to take a look a those plans!
Trying to download the free plans for this coop but the link is not working. Please send via email.
Please send me the zip files for the chicken coop.
Hi there! Like others I was hoping to look at the freebie plans before committing to the paid version (I’m from metric land so not sure if they will be easy to convert!). I would really appreciate you sharing the zip file with me via email if still possible.
Thanks so much in advance!
(p.s. have to laugh at the people outraged that your free plans aren’t downloading, the gall of some people)
The zip file doesn’t work. Is there a fix?
Hi John, I’ll email you.
Did the zip file get fixed? I’d like to purchase the plans but if The zip is corrupt …..
Hello, I purchased the full plans last month for a client, and being a general contractor even, the plans are excessively detailed.
Trying to download the zip file, as with others unable to do so….please send via email, thank you.
And excellent work on the coop, its beyond the average DIYer ability.
Hi David – Thanks so much David. I’ll send via email to you. I’m having my developer look at why the download isn’t working. jaden
Just ordered the file. Was wondering the estimated cost of entire project. Thanks
Bought like the rest..zip file is corrupt. Maybe just fix the zip file instead of emailing when someone can’t download? Please email me the correct zip file ASAP. Thanks.
I’ll re-upload the zip file, but I’ll email you right now. jaden
Hello, your chicken coop looks amazing. Great work!! I However, I just downloaded your SketchUp plan from the link provided , but I was unable to unzip it. My WinRAR gave me the following error message “The archive is either in unknown format or damaged.” Please help!
Thanks!
It would have been nice to know the materials cost for the coop was just under $2k.
The plans are decent, but for sure these plans were not made for a novice DIY.
I hear you Dave. Lumber prices have skyrocketed and are now much higher than in June.
For $2500k+ I can buy more free range organic eggs than I can eat in my life time. I’m in my 70s and have dogs, cats and a large garden to maintain without building an expensive chicken coop and maintaining the hens…not to mention litter, feed and time involved.
Hi, we purchased the plans but to two amateurs, it’s a bit overwhelming and confusing at some parts.
Do you have a simple cut list, and/or a step by step list to use? A little more detail than your blog post, but a little less “official” than the plans? Please email me if you have either/or/and/both…. thanks.
Hi Elizabeth – we do not have cut list. The photos on the website shows you our steps for creating the chicken coop.
I’m not really an Amateur as I have built a house from scratch and helped several others. I can say both the plans which I purchased along with the material list left quite a bit to be desired. Generally the material list showed at least 30% more than was needed. An example was the the sided, called for 6 sheets, I used 4, the fabric cloth called for 100ft of 4′, I used 50. I really ignored the rest of it.
On the plans, they were more than fuzzy on the relationship between the roof and the uprights and how they related to each other. They went overboard on the base and drainage, and I had to rely on the pictures for the coop interior. Was it worth the $15.00, probably but I think I could have done just as well using the pictures.
Now the Coop itself, it is really a Palace for sure! I looked all over the internet and liked this one the best. I just finished and I am not disappointed. It certainly has all the bells and whistles.
Can’t wait to look through the plans for this coop. It is exactly what we have been looking for. However, the roof is angled the wrong way. Is there anyway of changing which way the roof slopes? We are trying to direct rain water down a hill next to where the cool will be.
Hi Sarah – We only have the options to design the coop this way. I’m sure if you have someone familiar with basic construction, they could modify the roof for your needs! jaden
Hi! I am unable to open the zipfile. It is saying forbidden or corrupt. Any idea how to fix this?
Thanks!
Hi Jessica – I’ll email them to you! jaden
please sketchup file to me as well
Love the walk thru of the build! I was wondering if you would have a suggestion on customization for laying ducks? We decided to have a mix of hens and ducks, wife loves duck eggs, so I was looking for a plan I can alter to accommodate for the ground layers. Any suggestions would be great!
Hi Andrew – we don’t have layout for ducks unfortunately. But how exciting!!! We had wild duck and they laid their eggs in the tall grass. jaden
I ordered the plans and due to…let’s say…a miscommunication in our home, we either did not receive or one of us may have deleted them. Can they be emailed again possibly?
I’ll send them to you! jaden
How long (hrs./days) did it take to build ?
Scott said “ Probably about 20 man hours, but that was by myself and trying to figure things out. Staining was the biggest slow down. Would be faster to build it and paint afterwards.”
Thank you.
A lot more than 20 hours to build and as an earlier poster stated there is LOTS of extra material. I have had to go back to the pictures to figure things out. And I also have discovered you did not build yours to the material list. There’s a lot of differences. The biggest issues I had/have is your dimensions, there not intuitively obvious. And why are all the angles reciprocals? Like the trim around the chicken’s door, it’s got 135degrees, it’s a 45 degree angle, shouldn’t have to subtract 135 from 180.. to figure it out. That’s not the only place, there a couple more. lots of armature mistakes. All in all I am happy but there were lots of headaches along the way figuring things out, not straight forward. I’d also highly recommend putting 1/4″ plywood on the inside of the coop and contact cementing 4 ft. x 8 ft. fiberglass reinforced wall panel Home depot sells, for bathrooms. All the Carolina Coops use this and it’s well worth the money for cleaning etc. Just hose it right down and your done. just my 2 cents.
I bought the plans and tried to download them, but it must be a old excel file and the PDFs say they are corrupt. Is there any way you can e-mail them to me? I love this coup and plan to build in over the next two weeks.
Sure no problem! -jaden
Can you tell me the e-mail address you sent the files to? We tried opening them with several different computers and it says the PFD files are corrupt. Thank you for your help.
Hi- I’ll email you again with the files. The should work (we’ve been selling over 20 coop plans per day) -Jaden
I have not received my plans yet. I ordered them a week ago.
Do to the abuse of C C information, if you will send me a copy of the plans I will get a check off to you immediately. The Palace Chicken coup plans. I know it should cost me more due to shipping cost. Thank you
Hi John – this is the only way we sell them. Shopify handles all of our merchant transactions – we don’t see your credit card info. Shopify is one of the largest e-commerce merchants.
We are about half way through building the coop. Love the plans! I have a few construction questions. Can someone email me?
Stacie – email me at hello@steamykitchen.com!
Where did you make the blueprint/design of the coop?
Hi Kaden – we have the coop plans for sale. We hired an engineer to draft the plans.
I’ve been trying to contact you at the email on the site, but it is being returned as not a valid address. Can you please email me?
Sure!
Awesome job and I’m going to build his exact same coop
We purchased your plans and have ordered all of the materials! We finished the concrete foundation and are ready to begin construction! First question is – how did you secure the base to the concrete foundation? Thanks!
Hi Elizabeth! Fantastic! I’ll ask Scott and email you back.
Hi again! Scott said “Explosive fasteners. See the coop write up on website!”
Love the design. I could not get to the SketchUp plans/zip file as it gave a forbidden reply. Could you email the zip file?
Thanks,
Greg
Hi Greg! Fixed the link. Should work now.
Can you tell me how much the coop was to make?
It was under $2000 for all the lumber, roof, everything.
Purchased the plans, but not sure how to access the download. How do I do so? Also, any thoughts/suggestions on automatic feeders, waterers?
Hi Mac – look in your email for the plans. We never had automatic feeders or waterers. If you find a good solution, let us know!
Just curious how much all in with all the materials did the project cost? Trying to get a good idea on budget.
BTW. $10 for your detailed plans is a bargain.
The project will cost roughly $2,000. I know it sounds like a lot, but it is a big structure, built to last many, many years and through bad weather.
thanks, was about to ask
Nice coop! lots and lots of details and good ideas! However, I thought you were using the Deep Litter Method for the run… I liked the idea of the footer, then you added that drainage and sand. How did that work out?
It worked well in Florida, where we get a lot of rain.
I’ve tried using both a regular browser as well as Google Chrome. In both cases, I cannot follow the link to purchase your plans for $10. Aaaaaargh!
Ack! The link must have broken. Here’s where you can buy the coop plans – Jaden
Hi there!
I love your chicken coop! We are going to try to build one. I’m about to buy the $10 plans online. It looks like I will get a link to download? But then I need to print on 81/2 x 11 paper or larger? I’m concerned that the plans are too big for regular paper that I can print on….?
And if we don’t have much success, how much for you to build the chicken coop for us? Ha ha ha
Thanks, Lori
Hi there – yes, you can print out the plans on regular paper. The plans will print out just fine! They are step by step.
Hi I bought the plans but now I can’t seem to find them to download. Can you please help me?
Hi Kelli – I’ll email you! -jaden
Hi Scott & Jaden,
I just purchased the plans for this beautiful coop, but am not able to access them. I opened the materials list, but it is full of pixels. I am at a loss as I do not see any way to access the files once purchased. Also, I saw the receipt pop up, but didn’t receive an email. Please advise.
Thank you so much!
Hi Maria – Scott will email you shortly! -Jaden
Has anyone added a storage room to these plans? I don’t think it would be difficult by extending at the end of the run and creating the room for feed, bedding and other materials (perhaps putting a window in?). I also have a solar panel on timer that we use to charge a battery for lighting in the coop that I would need to adapt.
Did you only use the L and T brackets for the door? I was considering pocket holes.
Correct Dale. I used them for the door only. Pocket holes should be fine.
Hi all,
Are there any updates on the metric update? I purchased the plans in the original measurements, but it is proving a pain and a half to convert them to anything remotely functional.
Best regards from Bulgaria!
Hi there! We have finished 90% of the coop, enough to get our girls in and they love it! We are finally finishing our nesting boxes but realized our PDF plans are lacking the actual instructions. The PDF goes from page 215-220 and then skips again to 225, all of which seem to cover the nesting boxes. Any chance you have those pages to send? Thanks so much!!!
Kathryn,
You should be able to download the latest copy of the plans from the download page link sent to you via email when you purchased. The latest version will always be available for download. If need be I can resend you the link.
Scott
I have tried to pay for the plans several times and is does not go through. I even downloaded SketchUp Viewer and still nothing.
Stephen I sent you an email.
Hi guys,
This looks great! We would like to try and scale up this design a bit for 26 hens. Now I say that, but this coop will serve as the hub for a paddock system with two or three larger fenced in areas. So they’ll have access to lots of running around outside of the coop itself. This coop would serve as the primary run and nesting area.
Do you think this design would be adaptable for that many hens? If so, how much room should be devoted to their nesting area? Or do you suppose a a larger shed-lik configuration would be better for that many? Thanks so much for putting all of this information together.
Beau, that is an interesting and fascinating question. The first consideration is going to be the health of your flock. To keep birds healthy requires an adequate amount of space to prevent overcrowding. Coop space will need to be approximately 3 square feet per average size bird. Smaller birds require less. So we are looking at approximately 75 square feet of coop space. You’ll also need approximately 26 linear feet of roosting bar and approximately 8-10 nesting boxes. Yes, you could scale up the coop to work or scale it up to in size and add a second raised coop on the other end of the run. If you are going to have other areas for your flock then you don’t need to worry about the run space beneath the coop. There definitely is a point in which it will be easier to switch to a non-raised coop structure (like a shed). But the real determining factors will be your run space, ease of build, ease of maintenance, aesthetics, and of course health and security of your flock. Since I like a challenge, I would probably scale it from a 6′ x 12′ coop to an 8′ x 20′ coop with a raised coop area on both ends measuring 8′ x 6′ with 5 nesting boxes on each. Otherwise, an 8′ x 10′ or 8′ x 12′ shed would work. Hope this helps. – Scott
Thanks so much for the feedback, Scott. You’ve given me some things to think about. Thanks again, and I’ll let you know if I end up scaling up your design!
I have tried to download the plans but it will not open, any suggestions?
Usually, most people have a problem opening the SketchUp file. You will need to ensure you have Google’s SketchUp program installed to open the file. Go to Google and search for SketchUp and it will provide instructions on how to install the program.
I purchased the plans and cannot access to print. My printer ran out of ink and it was a day later until I could get more
David,
You should have received an email containing a link to your download page so you have access at any time. I will send you another email with it to ensure you get it. Often these emails find their way into the Promotions tab or Spam folders of some email clients. Please check there as well.
Scott
Do you have assembly instructions as well?
Currently, there is no step by step assembly instructions. These plans are similar to blueprints you would see for a house. But relatively straight forward assembly.
I got the coop framed and the roof on, but I have a question framed area still shakes from front to back at the top and is that normal. If not what would cause this and how would I correct it.
Hmmm, mine was fairly solid by the time I put the sheathing on the roof. It was further stiffened when I put the sides panels of the coop portion on as well as the inside braces (diagonal 2×4’s) of the run side. If needed you can add more diagonal bracing between the upright studs and the roof rafters. Having said that, our coop did survive a micro-tornado that hit our property.
I ordered my plans a week ago, when will I get them?
Trying to get my PDF plans for the palace but I can’t go thru, if any other way to send the money and get the plans. Thank you.
Carlos, I sent you an email with details on how to get the plans.
Scott- I purchased the Plans for the coop and materials list, but I clicked off the page and now cant access them to download the PDF. Could you give me access to download?
Trent, I sent you an email. Scott
I purchased the plans and can no longer get to the page where I can download them. Help?
Deana, I sent you an email.
Hi the concrete listed in the build materials. Is that enough concrete to make the whole footer or how much you used only needing one 12 ft side. Since I don’t have a slab to connect to like you did will I need more or was it already calculated out to make the whole footer.
The concrete listed is a rough estimate of what you will need. There are a number of factors that will impact the volume needed. If you dig a deeper footer, or have uneven ground which will require your footer being build up in certain parts will increase the amount of concrete you will need.
Hi, my name is Brock Slaymaker.
I just paid for your chicken coop plans but was unable to get them downloaded. Can you email them to me or email me a link to a printable version?
Thanks!
Brock Slaymaker
Hi Brock, I sent you an email. Scott
Hey, I’m in the middle of this build using the PDF plans and seem to have hit a small snag. When building the nesting box, the side and divider pieces are 1′-1 1/4″ on the short side but the back piece is only 1′ tall. This is the only spot I’ve found which doesn’t really show the assembly of the pieces. With the 1/2″ thick bottom, the back piece is 1 3/4″ too short to match the frame, or am I assembling this incorrectly?
The four upright divider/side pieces are 11 – 1/2 inches tall at the short side. They should sit on top of the nesting box floor and be attached from the bottom. The back piece should be 12 inches tall. With the 11 1/2 inch sides plus 1/2 inch from the floor, the 12 inch back piece should line up correctly. Let me know if your plans show something different.
Where are the corner braces used and how
Corner braces were used to create the door to help strengthen it. I used them on all four corners.
Hi there – I’ve tried a few times to purchase your plans and it doesn’t seem to be working. Can you email them to me please?
Thank you!
Kristin, I will take care of this for you. – Scott
I work for a high school and we are thinking about making these for a fundraiser that my 9th grade students will be building. Can you give me a rough estimate of cost of material so I can see if it is a feasible option for a fundraiser, we would sell them for cost but I think it would be hard to sell if we are looking at a 800 material cost
Never thought about using this as a fundraiser. Interesting idea. I think the cost of materials if you strip it down to bare minimums would be around $1,000 if using all new material. You would get some economy of scale if building more than one at a time. The challenge may be in moving these coops. They are fairly large 6’x12’x9′ and heavy. Perhaps, another idea might be to get local sponsors for hardware and lumber and then have a coop raising where someone wishes to have a coop built, they pay $1000, and the students help build the project. Get some coverage from local papers on how students are helping in the area and give exposure to your sponsors. Just an idea.
Hi there, I’m trying to purchase the plans but get an error message. Do you have an updated link I can use. I’m very excited to get this coop going for ladies we’re expecting in about 5 weeks!
Hi Renee – sorry about that – the link broke! Here is the correct link.
Hi,
After a long research of a coop, I came across this one and I loved it since I saw it. Itll be my first time building a coop and I hope I can do justice to what you created lol. Now, before buying your plans is there anything I need to know? Ive been reading through the comments but they come all the way from 2013 (thats a lot) lol. Do the plans have all the specifications for everything i would need to buy? Measures, screws, what tools and etc? Itll be my first time doing anything like this, this is like a goal/project and set myself to, and i really want to finish it and actually do it right. Any advice regarding material or something like, the measures on the plan are not accurate as of today or something like that? Please if you could reply i would appreciate it. Thank you so much.
Alberty, there are a ton of comments on the plans. There are a lot of good ideas and suggestions if you wish to read through them. The plans do contain a material list of everything needed to build the coop. It does not contain a list of tools required to build it. Tools like a hammer, saw, drill, and measuring tape are obviously required to build such a project but don’t need to be bought. Many can be borrowed from a friend or neighbor. Heck, borrow your friend or neighbor to help build it. Parts of the project will be specific to your build. For example, do you need the footer? If so you will need tools to work with the concrete and a powder nailer to attach the coop to the footer. I will leave you with this last thought, this was my first time building a coop and I didn’t even have plans. You can do it!
Do you have a free supply list? or will that be found on your detailed plans?
Lisa, there is a detailed supply list included with the plans so you can price things out ahead of time. If there is a question I can help answer, please fire away. – Scott
Would it be possible to have the dimensions in the coop plans converted to metric from feet and inches and made available as a choice when purchasing? I would have thought it would be a simple exercise by the expert who drew up the original plans and it would make it much easier for europeans to measure up and make the coop.
Norman, I thought it would be easy to do as well. When we contacted the draftsman who drew up the plans, he pointed out that it’s not just the lengths of lumber that need to be updated, it’s all the lumber dimensions, hardware sizes, and availability of products. It is going to take a full rework of the project to get it converted over to metric. We are weighing the cost of conversion against the demand to see if it is worthwhile to pursue the conversion.
Hello,
any news on metric version? I really like your coop and want to build one like yours. Having plan in metric would really ease the job.
I am looking into this. We are searching for a new draftsman that has experience with metric conversions and lumber construction. Will keep you posted.
I would also be very interested in a metric version. Has it been converted yet?
Cheers from Europe!
Unfortunately not yet.
Purchased your plans but can’t see how you got the groove panels for the sides.
Was this plywood which already had the groves or did you cut them in?
Thanks
The panels used for the sides and nesting box are siding panels with the grooves already made into the board. Here is an example: https://www.lowes.com/pd/Plytanium-Common-0-594-in-x-48-in-x-96-in-Actual-0-563-in-x-47-875-in-x-95-875-in-T1-11-Natural-Rough-Sawn-SYP-Plywood-Untreated-Wood-Siding-Panel/3010839. You really can use anything you like for the siding. I did see one chicken coop made with old discarded road signs (like stop signs, speed limit signs and yield signs). Keep in mind your environment when choosing siding materials. Metal siding like the signs might be very decorative and fun but it might transfer too much heat in a hot climate or too much cold in a snowy environment.
Nice job.
Is it possible to pay for the plans using PayPal? I’m happy to pay for the plans but just don’t trust other websites with my credit card info. Thx!
Sure, that’s no problem. I’ll have Scott email you directly.
I just bought the plans and looked over everything again and can’t find roosting bars. Where/how did you install them?
Good catch Ed. It was something that was left off the plans. We played around with ours trying different locations and materials. We used everything from tree branches to 2×4’s. In the end, we decided to go with a 2×4 across the front of the coop just above the nesting boxes across to the other side. We made a “U” shaped bracket with three pieces of 1×2 on each side of the coop and set the 2×4 in the “U”s. We could easily remove the bar for cleaning. If you look back in the post for the picture of the trim pieces installed on the nesting boxes, you can see the bracket that holds the roosting bar (Unpainted 2×4). The picture of the inside of the sliding door shows the other side of the roosting bar. Hope that helps.
I would be willing to pay if you came up with a larger version for 12 chickens.
Were the existing plans designed with least amount of waste in mind?
Markus, we were considering expanding the coop to allow for 12 chickens. We were going to add a second 4×6 coop area on the opposite end making the total footprint of the coop 16 feet wide by 6 feet deep. That would give 96 sq ft run area and 2 x 24 sq ft coop area allowing enough room for the 12 birds.
As far as “waste”, it wasn’t designed for minimal waste. The biggest area of waste is the siding. The coop is 6 ft deep, but the siding came in 8 ft sheets. While we tried to minimize waste by using pieces in the nesting box, but it’s complicated by the way the siding’s tongue and grove worked together. If you wish to minimize waste, you can use a different type of siding. But the rest of the coop had minimal waste.
I need Palace chicken coop plan in pdf format. How can I buy it? Pls advice
Jaweed, you can get the plans here: https://coop.steamykitchen.com/coop-order-form-start
I am having trouble using the Google Sket h you recommended and would love a copy of the plans. Is there another way to get them?
Hi Sandi – We offer Google Sketchup plans for free and $10 for the pdf that you can print out if you don’t have Google Sketchup.
I like your idea for the drainage system, but have read some negative comments about having chickens on sand or gravel. Of course, the comments aren’t based on experience, just opinion as far as I can tell.
What has been your experience using the sand- good, bad, or indifferent? Do you occasionally rake the dried poop out, or just slurry it down through the sand and gravel with a hose?
I can only speak positively about the sand. It does provide great drainage through the floor of the run as well as being easy to clean. We take a yard rake about once a month and rake the sand. Once we collect all the feathers, poop, and other debris into a pile we sift it through a homemade grate and dump the debris in the compost bin. Super easy. The one downside of sand is the chickens love to scratch and dig it. Occasionally it flies out of the sides of the coop. Fortunately, the coop is in an area where a little sand is not an issue. We have added a bag or two on occasion to keep the level up.
Having said that, I will mention that sand does work best for our situation, which in this case is an area that can be prone to slight flooding with daily heavy rains in the summer. If your situation is different then the naturally occurring soil may be perfect making the additional cost of a drainage system completely unnecessary. Hopefully, I have answered your question.
Could this be made into a mobile unit to be kept on grass?
Hi Rich, it would be too big/heavy as mobile unit.
Trying to use google sketch and purchase the plans….please send them to me if still available. trying to get the link above to work!
Love the coop and plans! I just started building it down in South Florida yesterday (and by start, all I did was the bottom kick plates… lol)
I’m doing this in the evenings for the next few weeks, but had a question. How did you attach all the roof trusses to the uprights? In your images above (chicken coop 15) where you have them braced, I can understand the nailing/screwing together, but in image 19 when you start adding in the rest of the lumber I’m just not sure? I would think maybe some mending plates, but looking a the bill of materials I dont see them. I see some corner braces, but only 16?
Trying to think of how best to do this 🙂
Love the coop. Wife does, too.
Chris, good question. I am thinking your question refers to the small rafter pieces between the uprights that run along the front and the back of the coop. (If not, let me know.) Those shorter pieces are “end” nailed on one end and “toe” nailed on the other. I started on one end and nailed the first piece through the rafter that runs from front to back of the coop. These two nails were parallel to the ground and went straight through the horizontal rafter perpendicular to the short rafter piece you are installing. Then on the other end of the short rafter piece, I drove a nail in from the bottom and one from the top at a 45′ angle through the rafter into the next horizontal rafter. Then I installed the next piece the same way working from one end to the other. Does that make sense?
Is there a way to pay for this using PayPal or Venmo? I’m happy to pay for the plans but I do not trusts other websites with my credit card info
Jordyn, thank you for the question. We used to use PayPal but moved over to Stripe. Both systems are secure and use SSL to encrypt all your information. I will send some information to your email shortly. – Scott
How much $$ did the entire coop cost you? Also, how long did it take to build?
It cost us approximately $2,000 and took approximately 4 weekends. Keep in mind that someone helping will greatly speed the build up. Also painting everything at the end will greatly accelerate the build time.
Hi,
Dies this estimation include any weatherproofing or electricity? We live in Minnesota.
Is there a way to reduce this cost? This is an awesome design but the cost seems a bit steep for us.
Hi there – We added electricity just via extension cord. This is the only design we created, I’m sure you can use different materials that are cheaper, but if you’re in Minnesota, I wouldn’t go cheap on the materials.
The list of materials specifies 50 each 2X4X8′ and 9 each 2X4X92-5/8″. The plans didn’t specify where either one would be used, only 2X4 lumber. I had assumed the 92-5/8″ long boards were being used so as not to have to cut them, but I don’t see any that are that long specifically. Can you clarify?
Great question! The 92-5/8” boards are used as the rafters. Along with the two 14’ 2×4’s make the roof 8 foot from front to rear.
Scott,
Looking at the plans, in particular, the CC0098-220 Nest Box Details, for item #8 Nest Back – it shows QTY 6. Is that correct? It seems to me it’s a single 1/2″ plywood piece and should be QTY 1.
Just needed to clarify.
You are correct, it should only be QTY 1 and not 6. Looks like the 6 got carried over from the chocks (part 7). Will update. Thank you for the good catch!
Hello Scott,
Your design looks fantastic. It is just a bummer than I run Linux and cannot even access the online software for that particular file 🙁 Looks like a fun program to mess around in as well. Is there any possible chance you could flatten and make those files into a PDF? Placing into PDF may get a couple more downloads from people I have looked up instructions on how to do so, please see: https://help.sketchup.com/en/article/3000167
I searched for free chicken coops. Yours came up, but then saw it costs$10. This is irritating. I would really like dimensions so I can see if this would work for me.
The coop plans are free to download in Google Sketchup, which is what we used to create the coop.
Scott, your coop and run are beautiful and so well designed and built. Your blog post, too, is just amazing. I really appreciate your detailed information and willingness to share it. We built our hen house eight years ago and I have been wanting to add a larger run with a brooding house. Your design is exactly what I have in mind. I’m so glad I found your post. Thank you! ~ Katie
This is what our current house looks like. I will send you an update after we put on the addition.
http://maplegroveplace.blogspot.com/2012/07/vintage-hen-house-design.html
Hello,
I live in Wisconsin- Do you think the coop would be too big for 4 hens? I would probably have to insulate the coop & maybe modify the windows somehow. Not sure if the openings are suited for the cold winters when closed. I’m trying to get my dad & brother to build me a coop; my dad wants building plans so they don’t have to ‘wing it’!!
Michelle, It would be fine for 4 hens, especially if you insulate the coop. You would be loosing some internal space when you move the nesting boxes inside the coop. Replace the hatch cover style windows with some actual windows that can be opened during the summer would help. There are some issues with ventilation during the cold months and keeping water from freezing that I am not familiar with in Florida. I have seen a few pictures of insulated coops around, but honestly, I wasn’t looking for that. The coop would be adaptable for cold climate but it would take a little creative work to do it.
– Scott
Hi Michelle. Isn’t Scott’s coop design wonderful? It would be perfect for 4 chickens. I live in Pennsylvania where our winters get pretty cold, probably not as cold as in Wisconsin, but still we drop down into the ‘teens or single digits at times. Our hen house is not insulated nor heated. I’ve kept chickens for eight years now and they have thrived well through the winters. The most important thing is to select cold hardy chickens. You could insulate your coop and I’m sure that would be fine for you. I would never encourage heat lamps because of fire hazards. Since I check on my chickens a couple of times a day anyhow, I just keep an extra water feeder in my basement and take them fresh water once or twice a day to replace the frozen water. I hope you get your coop soon! ~ Katie
Here are a few more tips for keeping chickens in cold weather:
http://maplegroveplace.blogspot.com/2013/01/keeping-chickens-in-winter.html
A head-count shows ya’ll have six hens, yet your coop only has three bins… lol, You making them girls double up?
No matter… I can add bins to the other three sides with a little modifications. REALLY like your build. I’ll send ya’ll some $$$ once I clear this with Momma.
Yeah, they don’t lay all at the same time. Usually different times in the morning.
Hello,
Can you kindly tell me what is the rough estimate to building the coop but without the concrete slab.
I plan to put it as is on the grass. I know it has a disadvantage, but i just want to see the estimate of the coop with no slab.
Thank you.
Mike
Hi Mike, Without the slab, it will be roughly $1,000 to $1,500, depending on which type of roofing material you use. The slab itself is about $300 – you don’t need it if you live in a drier area. We lived in Florida with big rainy season, and that particular spot in our yard was prone to flooding.
Scott,
Loved the look. My home is similar with the lean to roof.
Took the frame drawing you showed and made some adjustments to fit my yard, shaded areas etc.
Almost completed and I would love to send you pics.
Not sure how.
Thanks for the inspiration!
Hi Chet! We’d love to see your photos! Email them to mail@steamykitchen.com.
Can you give me a rough estimate on a cost to build this?
Christy, if you are going out and buying everything new and with the metal roof, you can expect to spend between $1,500 – $2,000. If you look at recycling and using scraps from build sites, cheaper siding, less expensive roof, going to re-purpose stores then the cost can be cut considerably. One contributor mentioned they were taking down an old shed and used lumber from it to build their coop. Hope that helps.
Epic work for someone who’s not a structural engineer or architect. But I guess as a web developer…you’re still an engineer, which makes sense as to how you were able to achieve building such a beautiful coop. Bravo!
Kaitlyn, I sent you an email with instructions. – Scott
Hi there.. My name is Staffan, and i’m from Sweden..I´m not used to inches
But it’s a wonderfull coop
So is it possible to recieve the plans in metric measurements?
Im about to build something just like this coop, and therefore would be very glad to “steal” your ideas 🙂 without trial an errors…
/Staffan
Staffan, unfortunately, the coop plans are not currently available in metric measurements.
Hello all,
I’m trying to download the PDF but there is no link to it…. could anyone email me?
Hi Karina – the Coop plans are free to download in Google Sketchup format if you are familiar with that program. If you need a PDF, the plans are available to purchase for $10. We’ve sold over 500 coop plans so far and have many happy customers who have built the coop! Here’s how to purchase or download https://steamykitchen.com/20640-the-palace-chicken-coop.html#chicken-coop-plans
Hi!
I have been looking for plans for a coop for a while and your design looks great! I live in South Florida. I really wanted to have the coop and enclosure sit on top of the grass. I was going to put a bib around the entire structure to keep the racoons from digging under and into the enclosure. Any thoughts on having it directly on the lawn? I was thinking of having the roof cover only the coop section so the grass would still get sun. It does flood a bit when we have the heavy downpours but seems to drain quick enough. I was going to put it under our mango tree. Any thoughts on having the structure sit on the lawn instead of a concrete slab or pavers?
Sonia, the only two concerns I would have would be predators digging under the structure to get in and deterioration of the lumber in direct contact with the soil. Putting a bib around the structure and using treated lumber may help alleviate those concerns. Use of treated lumber in your build is a decision you will need to make. Some people are okay with it, others are not. I will say that with any number of chickens in the coop, your grass inside the run will eventually disappear. Chickens, when enclosed in the run will eventually scratch up all the grass.
Thanks for the reply Scott… I will have to rethink the bib and grass…
I’m currently about 95% complete with my build. I’ve sunk pier blocks with mounting posts into the ground and placed pressure treated 4×4 as my foundation. They are only an inch or two above the ground, so I expect them to last a long time and I will trench some hardware cloth about 8-10 inches into the ground all around it. I fully expect this to deter any vermin.
Sounds good! Send some pictures when you are done! Would love to see what your’s looks like!
Scott
The lawn will last about a week or two before the chickens turn it into dirt. They will dig up all living vegitation unless you move it around to alow the lawn to recover. But his coop is too large and heavy to move. Consider sand in the coop as many have used in your area.
Hi I ordered the plans from you weeks ago and still have not received them. I know the card went through because I was able to see all the blueprints on my iPad after I finished transaction. Purchased under Dina Weinell. Could you please email me at dweinell@gmail.com
Sent you an email. – Scott
Would like to get your plans for chicken coop
You can download the free 3D sketchup model I used to build the coop, or you can use the link to donate $10 to get the professional construction plans. Look at the links at the end of the post.
Hi Scott, I’m not sure I received all the files for the Palace Chicken Coop plans. Was there supposed to be instructions? If there was a file with instructions on how to build this Coop I didn’t receive them
Michael, there are no step by step instructions if that is what you are looking for. These plans are construction diagrams, much the same thing you would get when building a house. However, you can use the post pictures above as a general guide. And you can always ask questions. I’ll do my best to get you answers.
Scott,
I have been very much enjoying the story of your build and have purchased the PDF version for me to use on my coop, with a few twists. I was wondering though what stain you used? I really like the look.
Thanks again,
Sam
email – sbrickjr@gmail.com
Thompson’s Redwood Stain and Waterproof.
is it “semi transparent” or “solid” stain?? I really like the look and want to duplicate exactly.
Thanks again Scott,
Sam
Sam, I used the semi-transparent because I liked the look of the wood grain. – Scott
Scott what did you use for a door stop on the main access door?
I just used a piece of 1×2 attached to the inside 2×4 of the framing. The door is flush with the outer most 2×4 with the stop attached to the side of the inner 2×4. Does that make sense? (You can use multiple stops if you wish. eg: top, middle, and bottom. We used just one though.)
I have purchased the plans and started my build this last weekend. With the rainy weather here in the Pacific NW, I anticipate it’ll take me a few weekends to finish. I haven’t seen in the specs, where you suggest putting a roosting pole. Since I’m not very far along yet, I can’t quite picture where it ought to go. Any input is appreciated.
We actually didn’t include the roosting pole in the plans. Personal preference and is up to you to determine what you want to use (Branch, 2×4 or plastic pipe) and where you would like to mount it. We used a 2×4 with rounded corners and mounted it above the height of the nesting boxes up near the front window. (Made for easy counting of birds at night) Just screw a small block of wood in each side wall and then cut your pole to the width of the coop and set it on top of the blocks. You can attach it to the blocks with screws, or in our case, we made “U” out of pieces of wood on the side walls were the bar just rests. Then you can take it out for easy cleaning.
How did you orient the 2X4 you used for the roost? Wide dimension up or narrow?
Great question. We orientated the 2×4 with the wide dimension up and rounded the top two corners. I think either way would work.
Do you have a cost estimate for the supplies?
Cost estimates for all new materials can run between $1200 – $1500. Many of those cost can be decreased by using repurposed lumber or removing certain aspects of the project. If you don’t need a footer like we did, you can use old cinder blocks to make a perimeter the coop sits on. The metal roof we used was a major cost addition, but absolutely not required. We did have one user mention to us they acquired most of their building materials from dumpsters at a housing track under construction (they asked permission first). So there are creative ways to cost lower if that is an issue.
Scott
I got your plans and have begun the build. My question is how is the sand working out? I live in Phoenix and it can get 115 here in the summer. Does the sand get hot or smell when it gets wet?
The sand has worked out far better than I could have imagined. Its quick draining properties are great for rain. Doesn’t really smell and is incredibly easy to clean with a garden leaf rake and screen. With hotter temperatures, it’s imperative to give chickens plenty of shaded areas as well as fresh water.
Coop is almst done so I thought I would send a picture of the coop and a few changes that will make it easier to manage. I added an electric door that uses a blind motor to raise and lower the door. I also beveled the interior molding that covers the hardware cloth in the hopes some wil actually return to the coop wen they kick around the sand. I also added drawer slides under the coop so I can pull out and refill water and food without crawling under the coop. I picked up cabinet pistons that hold the nestinf box lid open or closed and they were less than $15 for 4.
Hi there,
Love your coop, we will be purchasing the plans to build ours. I’d like to know, now that it’s been in use for a while, would you change anything to make it more functional (easier cleaning, accessible, critter secure. etc,,?)
Thank you
~ Laurie
Laurie,
As far as the basic coop goes, there isn’t really anything I would change. The coop is very functional and relatively easy to maintain. The one consideration to mention is the ability to grab the eggs with a top opening nesting box. If you have wee little ones that will be collecting the eggs, then a step up will be needed, or you could convert the nesting box so the back panel drops down instead of lifting the top up.
We have considered ways to expand the coop to allow for more chickens, played with different feeders and watering solutions, and attempted simpler ways of cleaning the coop out, but those are all part of the fun of owning chickens. Other things that we considered as add-on projects are: solar power for automatic coop door, web cams and work lights, a water circulation system for better water, and a trail cam to keep an eye out for pesky racoons.
Scott
Hello Scott,
You done a great job and I liked this coop very much. I’m a starter and keen to build this coop at my place. Can you kind to email pdf plans? I appreciate information to help on this. cheers /rab
The pdf plans are available at the link above the comments.
Hi Scott,
Love the coop. What type of wood did you use to build it?
Jamie,
Regular old Pine lumber available at most home improvement stores.
Hey Scott! Love the plans and we are using these to build our coop. We are on the west coast of Florida and was torn between pressure treated 2x4s for wether issues. We are painting the coop so not sure if it’s worth the extra costs. Thoughts?
If you are painting the coop, you can probably forego the pressure treated 2x4s. I would suggest putting pressure treated 2x4s as your base plate (where there will be contact with soil/concrete. This will slow down the deterioration of the wood. You will need to maintain the painted surface to ensure moisture doesn’t get trapped int the wood. You could also go the extra mile and pick up a roll of sill seal (It’s Unfaced Polystyrene Roll) and place it between the concrete and the bottom base plate. – Scott
Hey Scott,
Very nice design! My needs are a little simpler given my location (N. CA) and under raised house installation site (no exposure to rain).
I was hoping you use your SketchUp file as a starting point and modify to my specific requirements. I downloaded the file but it is read only. Any chance of getting a read/write version?
thanks!
Keith
Keith,
The file shouldn’t be read only, but I sent you a different copy via email. Let me know if that one works. Also check to make sure you have the full copy of Google SketchUp and not just the viewer.
Scott
We did it! We built this coop in the grueling south western desert over the past 2 months or so. Mostly while the kids took their naps. Which if anyone is familiar with the area and the time kids generally take their naps , its mid day and 110+ degrees. It really is a nice coop Scott. At first we had ordered one. One of those prefab jobs. Real slick , Real Cheap. It came in a number of pieces and then those pieces were in pieces. It was damaged. To my wife’s dismay we sent it back. Already not able to find what I truly wanted in a coop. I cracked my knuckles and started browsing. Then we found a website that led us to yours. Looks nice – we thought. Whats level 3 difficulty – I thought. Bah! So, we set out and it all really came together. We tweaked it a little here and there. I made square cuts instead of angle cuts in a number of places. There was a few inches off here and there but I feel all in all it came out well. Its a great addition to our backyard and our kids love to go out and tend to the chickens when it cools off. Thank you for the plans. – I’ll add a few pictures below They may not post but a quick copy and paste should show em.
http://img.photobucket.com/albums/v115/rocez/14022077_10210590586986661_7848051816625236216_n_zpsgc0ejqqd.jpg
http://img.photobucket.com/albums/v115/rocez/14079831_10210590586746655_1870110604555167855_n_zpsb3o8tlap.jpg
http://img.photobucket.com/albums/v115/rocez/14102367_10210590587226667_5406825868284798923_n_zps5psbflhi.jpg
http://img.photobucket.com/albums/v115/rocez/14141964_10210590587506674_8969794973403995679_n_zpshoy5kotz.jpg
http://img.photobucket.com/albums/v115/rocez/14212740_10206641843837696_9057266934206233924_n_zpsllqjt6ro.jpg
John, I love your coop!!! You did an amazing job and I bet your chickens love it. – Jaden
John, this is inspirational, great job! We are getting ready to get started, I’ve spent the day converting the materials list from Menards (don’t have those around here) to Lowe’s, and getting read to go place a big order for delivery tomorrow. *gulp* I like how you did the base with the pavers, I think we are going to go that route. How have you liked that choice so far? We don’t have a need for drainage under our coop in New Jersey the way Scott does in Florida, and I’m guessing the same went for you in the desert! We’ve used pavers under our swingset and shed and it’s worked well.
Jen,
we were going to convert the materials to lowes and home depot as well. curious to know your price difference.
Thanks for the plans! Would love to send you a pic of our finished coop! Love it!
I sent a payment through PayPal a few weeks ago. Still have not received my plans.
Thanks
Hi Ron! They should have come automatically right after payment. Check your spam folder for “The Palace Chicken Coop” I’ll have Scott resend for you!
There is a French version of the plans ?
No sorry!
OK thanks anyway
we bought the plans last week. The $10 have cleared on my husband CC card, Stacy Capps days ago but we still have not received the plans. I also emailed last week but have yet to hear back?
I just sent you an email at this comment address. – Scott
We did not get an email? Can you send to kbeyer55@yahoo.com
Katie,
I sent you an email. Please check your inbox.
Scott
Looking for the PDF plans for this coop. Are these available?
The link to the page is located right above the comments section. It is a red button that says “Yes, I would like the plans…”. Which takes you to https://coop.steamykitchen.com/coop-order-form .
Such a nice coop. Only thing missing is a slide out tray for easy cleaning. Why didn’t you add that in the side with the wide door?
Hi John- Because we use a deep litter method – the tray would have to be at least 6-8″ deep and so big/heavy. Plus, it’s really easy to just use a shovel or a wide broom and clean out the coop.
What type of stain did you use? We’ve been told to be careful on what we use.
Your coop is beautiful!
We used Thompson’s Water Seal Stain, Redwood Color. Hadn’t heard anything about being careful about stains though.
Just paid for the plans a little while ago. Do the plans come via email? I haven’t gotten them yet. We are already 1/2 way through building but it is well worth the $10. Thank you!
Sharon, They should come fairly quickly. Should be in an email entitle “Here are your Steamy Kitchen Chicken Coop Plans”, which contains a link to download all 4 files. Check your spam folder and let me know if you got them. Otherwise, I will send the link manually as I see your order went through.
How long does it take to get the pdf in the email? All I got was a link to verify my email (which I now did) and nothing else.
J.D. – You should have received them already. Please let me know if you did not. Should be in a second email entitled “Here are your Steamy Kitchen Chicken Coop Plans”. Please check your spam folder as well.
Scott
I apologize I didn’t see the other responses prior to asking my questions, which you have already covered.
Can you please e-mail me the PDF also? Any plan information I can get would be extremely helpful.
Sincerely,
Z
Zachery, I am working today on getting the PDF version up. Hope to have it done soon.
I am impressed by this coop. I was at a client’s home who had one built much like yours and, although she offered to let me come out to measure and take photos of her coop, I luckily found this webpage instead!
Can you give me an idea of how much you spent on materials for this build-out and about how long it took you to assemble from start-finish?
You mentioned you were not an architect or a builder in your legal disclosure but I am curious if you have had experience building many other things and if you would categorize this as an intermediate or high skill-level project.
Thanks in advance,
Z
Zachery,
We spent approximately $1800 on the coop itself. But we choose to use all new materials and nice roofing material. It took me about two weeks working a couple of hours a day. As far as building, I would rank this as an intermediate level project. I found the project only requires simple construction techniques and nothing overly difficult to handle. Easily within reach of a Beginning DIY’er, just understand it will take a little longer if you are new to building projects of this size.
Scott
Getting chickens in a few weeks. Love what you’ve done. Thanks so much for sharing with the Internet at large. 🙂
Looking forward to the pdf plans. Great work!
Scott,
Could you email your plans to me, tried to download it, but didn’t work.
Thanks, your cooperation is awesome looking.
Rick
SSGT, USMC Veteran
Rick, I sent the SketchUp files to your email. There is also a PDF version coming soon. (Real Soon!)
I’m going to build this coop, will you please email me the plans. I have attempted to download sketchup but it will not work on my iPad. I would greatly appreciate the help. Thank you
Brandon at butlerbr44@hotmail.com
Brandon, I sent the SketchUp files via email. If SketchUp is not working on your iPad, then you may need to wait for the PDF version which is coming very shortly. (I sent it back for final changes today)
Hey Scott –
The Sketch-Up plans are great, and I can’t wait to get started. Only one quick question: Is there a different setting that shows the hen house in more detail? Specifically looking for a bit more detail on the hen house door, ventilation openings, and other sides of the hen house. I guess if you are close to having the updated plans than I can just wait for those. Thanks for doing all of this, it is a tremendous help to all of us and this looks like an awesome coop!
Erik
Erik,
The new PDF plans have what you are looking for. Every piece is detailed in the new plans. I just approved the final changes today and hope to have it back shortly. I will update the page when they are ready.
Awesome coop! Can you pleased end me the plans?
Thanks for your generosity!!
Jason,
I sent the plans to you via email.
I do not understand how the drain system is supposed to work. Are there holes on top? Is there only one exit, where is the opening?
There are holes drilled in the pipe that lies within the foundation. Then on one corner, there is a pipe that runs through the foundation our into the yard. So the water will drain into the pipe through the little holes drilled in the pipe, flow through the pipe, through the foundation and out on to the grassy area. This prevents the chicken run area from filling up like a pool. Hope that helps.
Great coop design. Can I kindly get the plans via email. I downloaded the zip file with sketch up but it does not show all the plans. Thanks
Talal, The download is just the 3D model I used to create the chicken coop. I did not have any other plans at the time. We are currently in the final stages of having the plans professional drawn out and hope to have them available shortly. I will update this page as soon as they are available.
Hi Scott,
I’ve been browsing the internet for days looking for a chicken coop and run. Looked at a number of prefabricated and build your own, each of design I’ve looked at seemed extremely small, then I came across yours which seems big enough for my four hens (to be acquired). Would this coop be big enough to house chicken full time as my allotment is too open to let them roam freely. Or should I need to create a bigger coop.
Should a small amount of vegetation be included in the floor space. Please can you email me your updated sketch up plans. Also what was the total cost (approx) minus the metal roof.
Cheers, David
David, the chicken coop was originally designed to keep the chickens in full time. We let them out when we were working on the garden just because Jaden enjoyed letting them wander about the yard. With only four chickens, they will have plenty of space. I am afraid any amount of vegetation introduced into the coop would be overcome by the chickens quickly. They have a knack of digging up and shredding vegetation while looking for bugs and insects. We did throw in green vegetables and other plants we trimmed from the garden in for special treats. They loved it. Also, we had a compost bin nearby that seemed to have a never-ending supply of black fly larvae that we would toss in the coop. The cost was $800 approximate without the roof. Cost could vary wildly based on the availability of building materials or scrap materials in your area.
Do you just have the one roost on the side with the window? Only see parts of it in photos. Thanks, building this design right now!! 🙂
Melissa, when we added more chicks to the coop after the initial five, I did add a second roost bar that made a “T” with the original. It is not in the original photo’s of the build because we only had 5 at the time.
Looks great and very functional. Great job. I would also like a copy hen you have time. LOL
Terry, I sent them to your email.
Great post and great coop! I’m actually hoping to get a copy of your plans as well if it isn’t too much trouble!
Sent via email Emma.
Love your design. Can plans be sent to email?
Sent via email Carlos.
Hi Scott. I love the chicken outhouse and a lot of positive comments to go with it. I would be most appreciative if you were to send me a copy of the plans by email. Adam
Hi Adam, sent the files to your email! Scott
I love your chicken coop, and I have chickens that are ready to “graduate” to a larger coop. I did not have any luck with the Sketchup program. Could you please email me the plans.
Thank you for your time
Jody
Jody, Unfortunately at this time we have no “plans” other than the SketchUp file. We are currently putting together construction diagrams in PDF form for easier use. They are being worked on by a professional draftsman, so hopefully we will have them shortly. Keep watching for an update.
Poor guy. Seems like all your spare time is spent emailing plans. Haha!
Have you thought of routing your gutter downspout into a water basin for the chix?
David, it sure does seem like a lot of time is spent emailing copies of plans out to people. We are in the process of updating the google SketchUp file to some more detailed construction diagrams and a bill of materials to make it easier for those who find SketchUp challenging or unable to install at all. To answer your question, we did install a rain barrel (Cost $7.50 from our county utilities department) and directed the down spot into it. Worked wonders, until the rainy season when we were getting far more water than the birds could ever drink. – Scott
Great job!
Your coop looks great and it is very generous of you to share the plans for your Palace Chicken Coop. I would appreciate a copy. Thanks – Ron
Ron, sent to your email! Good Luck!
What a fantastic design! And made with love and care. I would love to have the materials as I plan to build this coop as it’s the best I’ve seen. I downloaded the plans…and hope I can figure out how to read them, but if you can send a materials list, I’d be very grateful. Thanks!
Thanks Anne. If you look back in the comments a page or so, there is a list of materials used in creating the project. Also we are in the midst of putting together something a little more practical which will include the material list. Will post it here when it is ready. – Scott
Hi, I was wondering if you could email me the sketch up plans at your convenience! I really love your coop! Thank you.
Laurence, I sent them via email. Check your inbox / spam folder. – Scott
I’m sure your inundated with requests for plans to this phenomenal coop! Please add me to your list!
Cynthia, we are hoping to have new plans available shortly. Please check back in two weeks. – Scott
great design, was wondering if you could send me the plans. cant seem to get google sketch to work right.
Tabitha, we are hoping to have new plans available shortly. Please check back in two weeks. – Scott
Hi Scott just found your ‘Palace’ and tried to download the sketch up but apparently my computer isn’t modern enough is there any other way I can get the plans please. My ‘girls’ need better than what they have. Thanks
Frances, Unfortunately for now all we have is the SketchUp file. But the good news is we are currently having different plans drawn up that we can send out. Hopefully they will be done in the next few weeks. Keep an eye on this page as we will update it as they become available.
Scott
Thanks Scott will definitely be popping back to check for updates, lol will give me time to source materials and save.
cheers
Frances
I would absolutely love the plans for this chicken coop. I down loaded SketchUp, however, all I get is a picture and nothing else. So it doesn’t seem to be working. I want to surprise my hubby for his birthday with this so if you could email the plans, what I need, step by step instructions it would be greatly appreciated.
Thanks in advance,
Krissy
Krissy,
The picture you are looking at is a 3D model of the chicken coop I used to create it. Unfortunately we do not have an step by step instructions or detailed constructions plans. We are investigating ways to transform the 3D model into diagrams that can be used for construction. The good news is this post was written as a step by step journal of the creation process.
Scott
What a beautiful coop! Was wondering if you could email me the sketch up plans at your convenience! Thank you!
Sent via email Amanda.
Hi !
I found your great web site to have an idea how to build my chicken House ! I Finally juste finish it an I have 4 happy little chickens. I plan is what I expected. I juste change little things like.. take 2X3 And 1 foot lower… Asphalt shingles for roofing it’s cheaper. Thanks A lot
Horray!
Plan to start next week. Can you send the plans to me? Very practical coop. And good lookin’
Thank you
Marcie, I sent them via email.
Scott, we LOVE this coop want to build this weekend for our 6 new chicks. Can you send me the plans via email please?
Joan, I sent them via email.
Scott- Can you email plans to me. Very impressive coop. Great work. Thank you
Just sent them to you via email. Remember to check your spam folder if you do not see them.
Great job! Exactly what Im looking for. Could you email your files as well. Thanks!
Sent today.
Scott,
I downloaded the Google Sketch it and coop plans, also. I ve navigated the 3D drawings, yet dimensions and bill of materials are not visible. Are these available in the plans that are emailed?
Please send to me.
The plans that are emailed are just the SketchUp files we used. There is a “Tape Measure” tool in SketchUp that you can use to get the dimensions of each peice. The list of materials was listed in a prior comment. https://steamykitchen.com/20640-the-palace-chicken-coop.html/comment-page-6#comment-1247691
Scott,
I am grateful for your consideration. We have begun our layout and will build as close to your design as possible. Materials are up to $240.00, yet there are several new homes being built in my area and some lumber and plywood (scrap) is available for the asking. Thanks again for your generosity!
Michael,
Good luck with your build! Way to be resourceful! I saw several articles when I was doing my initial research on how people were building their coops for free or very minimal cost. I never thought to look at new home building sites and asking for scrap. That’s a great resource. – Scott
Scott,
This looks like a great project. Once again, could you send me a copy of the plans? Thanks.
Garrett
Hi Garrett – Scott is not feeling well today, and I think he has a more updated plan than the one I have. I’ll ask him to email to you later today! jaden
Sent Garret
Scott, I love the design and the positive feedback you received. I would really appreciate it if you could email me the plans. My son and I are going to build this together for his 5 hens.
Great size for five hens! Sent the plans.
can you send plans to brie1280@msn.com.
the zip file wont open on my end.
thank you
Sent Brie!
Scott,
Terrific!!! Just getting into chickens and planning for 5! Would you mind emailing me the plans
as well? Thanks!
I sent you the plans Larry, great size for five hens.
What does material cost. Our grandkids have saved 400.00 will that be enough for material
Bob, with the coop as I built it, it will run around $1500. A good portion of that is tied up in the Metal Roof and siding I used on the coop. Going with a shingled roof and using other recycled lumber products can greatly reduce your price. Concrete may be another area you can reduce cost in. If a high footer like ours is not needed to keep the ladies’ feet dry, then go a less expensive route. Just keep the wood ground contact point and handle it appropriately.
i figured out how to get the 3D model up on sketchup, but i cant find a list of measurements. is their anyway you could email me a blueprint with measurements on it? if so id appreciate it greatly.
Graydon, there is a Tape Measure tool in the SketchUp program you can use to get dimensions. We do not have an formal BluePrints for this build.
Scott,
I tried to download your set of plans for the coop as well but was unable to download it even after downloading the app for sketch up. Could you please email me a set of plans as well? I would very much appreciate it. Thanks so much!
Brian
Brian, the files have been sent via email today.
Would you mind emailing me the plans for this. The google sketch program wont download on any of our computers. Thank you!!
I sent the sketchup files, but we don’t have any other form of plans to send you.
Great plans! Looks very functional and curb appeal friendly. Please email files. Thank you.
Jonathan, I will email these out to you when I return to the office on Wednesday. Scott
do you have a supply list of everything we need
– I didn’t put together a materials list for the full project. I can give you some ballpark figures from what I remember:
2 – 14′ 2×4’s
6 – 12′ 2×4’s
50 – 8′ 2×4’s
9 – 92″ 2×4 wall studs for roof beams.
~20 – 8′ 1×2 furring strips (cheaper than normal 1×2’s)
~30 – 8′ 1×4 furring strips for trim work and roof (these had rounded edges and were cheaper.)
1 – 3/4″ 4’x8′ plywood for floor
4 – 1/2″ 4’x8′ plywood for roof sheathing
6 – 4’x8′ shipboard siding (a lot was wasted and could have been used for nesting boxes.)
4 – 3/4″ 16″x48″ craft boards for nesting boxes.
1 – 6′ 1×10 for ramp
1 – 1/4″ 2’x2′ plywood board for door.
1 roll of 3′ wide 1/2″ hardware cloth.
3 rolls of 2′ wide 1/2″ hardware cloth.
6 large hinges for doors and nesting box cover
6 small hinges for window covers.
2 heavy duty latches for doors
4 buckle hinges for window covers and nesting box latches
10′ small link black chain
6 small snap latches to keep door locks closed and window covers open.
2 metal plant hangers for feed and water
4 metal eye hooks for chicken ramp
5 larger metal eyes for door rope guides
15′ small white rope
Various gutter pieces to make 14′ gutter with downspout and end caps.
10 – gutter mounting clamps.
1/2 cubic yard of granite rock for sub floor
1 cubic yard of sand for run floor
1 role of 3′ wide weed barrier cloth
linoleum for coop and nesting box floor
16d Galvanized Nails for framing
10d Galvanized Nails for toe nailing framing
8d Galvanized Nails for joining 2×4’s together back to back
1 3/4″ Outdoor screws to join trim and plywood to 2×4’s
2 1/2″ Outdoor screws to join 2×4’s together (eg to sandwich hardware cloth)
1 3/4″ Galvanized Roofing Nails
pop-rivets for gutter
Gutter sealant
2 cans spray paint for gutter
paint for coop
roof material and parts.
*** I’m sure I have overlooked some of the parts. Use nails for framing as they are good against shearing and use screws where you want to pull things together tightly like out framing and walls to studs. If your husband is proficient toe nailer then the roofing beam plates I used aren’t needed.
Could you clarify what 4’x8′ shipboard siding is? Not sure what you are using for coop walls. Lowes doesn’t show it in a search. Thanks.
Search for “siding” and then select wood siding. There are several types available. The exact one we used was replaced by “Plytanium” siding. I will mention that you can use basically any siding material that you feel fits with the look and texture you are going for. I saw one chicken coop that used old metal road signs as it’s siding.
Thanks Scott. Also, am I reading your plans correctly? Is the outer siding of the coop walls sandwiched together with a sheet of plywood? I can’t tell from the pictures but it looks like the plan is showing dimensions for this.
Great question Kevin. The walls of the actual coop portion are made of just the siding. If you reply with an image number you are looking at, I can give you a more detailed answer. – Scott
Let me start by saying I also am not an architect or engineer. Thank you for the plans. I just need a little clarity. On your page 13 and 14 I see dimensions on multiple pieces of the same wall. One is drawn in red (like it is the siding). One is drawn in brown or tan. What is the difference in these? The figures look the same but the dimensions are slightly different.
Hi Kevin, I am not exactly sure what you are referring to. Can you grab me a screen capture and email it to me? – Scott
Hi! What wood did you use for the coop floor? Is it just a standard plywood?
The coop floor is a 3/4 inch piece of plywood covered with cheap linoleum for better durability and ease of cleaning. The coop floor is covered in 6 to 8 inches of shavings for the Deep Litter Method. Hope that helps.
Hi Scott,
Can I get a copy of the plans? and list of materials?
Thank you
Lorie,
I will email these out to you on Wednesday when I return to the office.
Scott
Is there any way to get a materials list for this design with the plans?
Do you have plans that show the size, lumber needed, etc.
Could you email me the plans you do have. I have downloaded Sketch-up
Thank you
Steve
Hi Scott,
I love your design and was hoping you could email the sketch up file to me? I don’t have a computer, just an iPad but have downloaded a sketch up viewer.
TIA
cheers
Rob
I sent a copy of the files to you in an email.
is there any way you could send me a copy of your plans i cant get the download to work my chicks are 2 weeks old and i need a forever home for them
Sent an email to you with the files.
I can’t get the download to work either.. wondering if you would email the plans to me as well!! I love this coop!! Thanks!
Sent Kenzie
Love your design and attention to detail. Would it be possible to email the plans rather than the sketchup program. Thanks.
Unfortunately, I do not have a set of plans. I literally built the coop straight from the sketchup model.
Just wanted to say thanks for the plans, used them as a basis for my design! Coop turned out perfect, thanks again!
https://goo.gl/photos/s2AqngQ6AGCEfMmB6
Chris,
Your coop looks fantastic! I love the PVC pipe feeder in the corner as well. Great job!
Very interested in building this chicken coop. I see where people are getting plans emailed to them, would it be possible to get those plans emailed to me please?
Sent them your way Dave.
Scott,
My wife and I are going to attempt to build this. Do you have plans you would email to me? I would really appreciate it. The coop you made is awesome!
Bryan
Sent the SketchUp files
Hi There – Great looking coop. We were looking at plans for our future chickens and came across yours. Would you mind emailing me the plans? Also, I was wondering what kind of wood did you use? And, could you tell me the approximate cost of the coop itself (not including the foundation)?
Thanks so much!
I’m glad to see that your “ladies” have such a spacious home and aren’t cramped up ( like some of the other coops on the internet). We are in the process of rebuilding, and I really like the look of yalls coop. After reading all of the SketchUp comments, I was wondering if you could please send me the plans? Keep up the great work!!!
Wondering if I could get your plans emailed to me!? I want to check out this Sketchup program as well. Thanks so much.
Liz
I greatly appreciate your plans, but i too am having trouble with sketchup. Could you please email them to me? Thank you so much
I sent them via email.
Can you also please send me the plans love the coop…Thanks
Thanks
Love, love this coop. My husband wants to get started on it but we cannot get the plans. PLEASE email parts lists and plans. My chickens are quickly outgrowing their temporary home!
Sent you the files via email.
We just bought 6 chickens. My husband and I love your coop. Tried to download the program but cannot access your plans. I think my computer is too old. Would it be possible to email the parts list and prints to me? Can’t wait to get started!
One question about the ventilation holes. Will you cover them during the winter.
Thank you in advance!
Awesome looking coop. Can’t wait to build it. Could you please email me the plans?
I really would love to build this for my kids, but I can not access the plans. I read every ones comments to see if I did something wrong with downloading. I followed all the steps and it just said, “Sorry, we can not convert this type of file. I seem many others are having the same problem. Is there anyway you could forward the plans to me? My email is shoelaces44@hotmail.com. Thank you for share such a great idea you had. I want my children to enjoy collecting the eggs and teach them how to take care of the animals.
Hi Sarah – After Google updated their Sketchup software, it seems our plan no longer opens correctly 🙁 Sorry about that!
Please update the plans as I am planning on building this over the weekend.
Thank you for this! I’ve redone the sketchup file (for the most part) and made the overall coop bigger. 15′ by 8′ with ~1 foot overhangs. I made the dimensional lumber to match exact dims, group them to components, etc. I’m sure I messed this up a couple times but hey! it was my first shot at a big sketchup project!
I’m trying to take as many pictures as I can and if I get my act together will post a coop build of it on BYC or some forum.
Just wanted to say thanks!
I really like your coop design. Could you email me the plans?
Thank you
Scott/Jaden,
Just FYI, Sketchup has a Dimension tool that can used to put them on the plans.
If you get the free “CutePDF” you can print the files to a PDF file. (www.cutepdf.com)
Nice coop BTW, I was planning to build one very similar.
Thanks, I will look into it since it seems to be requested often.
Love it. Exactly what we’re looking for in terms of size and aesthetics.
Question: You built it into a permanent foundation with poured concrete. We were thinking we would put the chickens directly on the ground. Would you say this is top heavy? If the base was hypothetically shored up and stabilized, do you think it could be “portable?” Like… move it 5′ over to give the chickens fresh grass under their feet, etc.
Top Heavy? Probably not, but the bigger concern would be weight. This structure would be fairly heavy and would require some mechanical means to move it. If I were looking to move it with a tractor, then I would want some sort of skids to move it and a reinforced tie point. We put it on a footer because of flooding issues as well as protection from predators that might burrow underneath the edge. Protection became our number one priority. I will say that a few chickens are capable of turning the amount of ground underneath the coop into barren moonscape in short order. You would probably end up moving the coop once a month (at least) and would need to keep replanting the grass. I love the idea of giving them fresh grass to scratch in, but not sure this coop lends itself well to the “tractor” style of coops.
How much all the materials cost? I’m designing a coop for my girlfriend and just wanted to know what my budget should be
The coop costs about $1100 to build + $900 roof. You can cut your costs by using a different material for your roof.
This is a wonderful coop and would love to build it myself. Just a question regarding the Sketch Up program. I was able to open the plans you created, but it is just a drawing with no numbers for lengths of the boards. I went through the tutorial, but could no figure that part out. What template should I be opening it up with? Thanks
Tracy, The Sketch Up program comes with a built in ruler (tape measure) so you can take the dimensions from each piece. Just be careful as dimensional lumber like 2×4 really isn’t 2 inches by 4 inches. Some allowances in length will be needed.
Is there any way to get a printout of the plans. I can not get Sketchup to work on my Mac. I have searched many coop designs and this is my favorite. Please send to jwc314@yahoo.com
We currently don’t have any way of printing out the sketch up file into a set of plans. Not sure if there is even a program to do that. So we are unable to send them out.
We found the coop/run we want to build!
Wedownloaded the SketchUp program and tried to open the zip file. But, SketchUp gave us an error message.
Is there a current link to these plans?
Hi Scott, Did you really need 50- 8/ 2x4s or is that a typo? I can’t count that many boards used in total in the photo. Thanks!
Brian, the reason the count is so high is because there is set of 2×4’s used to create the wall studs, then a second set that is used on the outside to sandwich the hardwire cloth in between. You could switch the outer 2×4’s to 1×4’s if you wish, but I thought the 2×4’s tended to line up better.
Thanks, Scott, this is helpful.
Hello it wouldn’t let me open the plans. I wish I could because I really like your idea and set up.
I love this plan. We are just beginning to contemplate having chickens. I have a question about predators… In addition to raccoons, hawks and bobcats; we have snakes which may be an issue. Have you found that the 1/2″ wire is keeping everything out? (Just want to make my girls are safe.)
Hi Nancy – We’ve found that the smaller snakes will stay away from the hens.
Wow that looks awesome!
If you had to estimate, how much do you think it cost you to build the entire coop?
About $1200 – $1500, with a large portion of the cost being the metal roof. I’m sure you could spend much less if you changed out the metal roofing.
This is a very nice coop–I love the overall look of it and it looks very well designed. I’m curious, though: how has the drainage system held up?
It looks like a simplified French drain set up but I’m wondering how well it actually works being on level ground with such small pipes. It seems like a great idea, of course, but the reality of the situation is often a bit different and I wonder if it’s a system worth investing in.
We lived in SW Florida (hurricane central!) where it rained like crazy in the summers every single day. No drainage problems whatsoever.
Before I start I want to say by way of apology, and if possible, and my English is not very strong.
I loved it, but much much, this coop.
I’m interested that few chickens comentasen me to this thought?
If measures increased only slightly, the part where the chickens sleep, believe also possible to increase the number of animals.
I can also have a rooster? (is that I’m interested to breed well, if I can advise would be fantastic)
Now the problem that I have is to pass measures to centimeters, in Spain the system is not used by inches.
The more advice to give me, the better.
the first serious attempt to have such animals, in life I’ve had.
Excuse spelling mistakes, be benevolent with me.
I thank you for your publication, and I thank you
While many factors dictate what size a coop needs to be, some basic guidelines would be:
1 chicken should have 4 square feet (0.35 m2) of coop (sleeping area) and 10 square feet (1 m2) of run area. You could have one rooster in the coop if you like.
Just love this post! What an informative and detailed tutorial! We recently purchased a home and I’m getting ready to do a post about our backyard dreams (which include building a chicken coop) later this week and I’d like to include a photo of Chicken Coop with a link back to this post with your permission. If you have any questions or concerns, feel free to email me at thejohnsonsplusdog at gmail dot com.
The major problem with this set of plans is the measurements call for a literal 2×4 . Guess what, a 2×4 is really 1.5″x 3.25″, this is standard and is what lumber yards carry in stock across the entire country. So in reality this entire plan is nonsense and only serves as general idea . People cannot use any of your measurements here , unless they custom mill an actual 2×4. Thanks buddy my wife made all the cuts you recommended and wasted a lot of boards , creating a nightmare of reconfiguration for me to deal with to salvage the wood.
I’m sorry you ran into challenges using our plans for making a chicken coop. I am the first to admit I am not an architect (as mentioned in the disclaimer!). And used the sketch-up tool to create the rough pans for me. I shared them here because so many people had asked for them. It was intended to be used to generate ideas and put together a coop similar. While constructing the coop, most of my cuts were made after measuring the required length on the coop itself. Just as an example, the base of my coupe is actually 6′ 1″ due to the tie in to the older concrete pad that I didn’t want to crack when nailing in the footers. It sounds like you found a way to adapt the coop to your situation. I will add a note to the post saying the sketch-up diagrams are using literal 2×4’s and lengths need to be adjusted accordingly. What cuts did I recommend, because I want to make sure there is an appropriate note by them?
Man, thanks for this post. I thought I was the only one who noticed this. Very frustrating. Every dimension had to be altered to fit actual lumber dimensions. Yours was the only post to mention this. The plans only served as a guideline and I built everything on the fly. Maybe that is what was intended anyway.
You’re welcome! Would love to see some pictures of your coop! Send them our way!
I also have trouble with that sketch up program. It says no longer windows vista compatible…it won’t load on my IPAD either and I really want to build this…is there any way you can forward this plan so I can try to print it in some other compatible format? Please send it via: patricia.miller77@yahoo.com.
I appreciate your assistance.
Pat
No problem. I’ll download and then forward to you.
I will need to start soon , Winter is already too close to start raising
Hello,
I’m zener from France. Congratulations for this nice chicken coop.
I’ll start building mine based on your plans in few days.
I have a question regarding the fundations. Is the chicken coop structure (frame) fixed on the concrete fundations you’ve created ?
Thanks for your help
can you please e-mail me the plans to build this awesome looking hen house, thanks in advance.
Hi Wayne- the plans are available to download, just look at end of post and right before all the comments.
Hi Jaden, you husband has done a great job and i must follow your plan for building it…
Hi. I am new to raising chickens and have searched everywhere for free coop plans. I like your plan and downloaded both Google sketchup and your plans to my Mac but cannot open them. Can you email them to me please? Thanks.
What a wonderful job you have done creating this site. I like Scott said in his post have been spending countless hours researching what I wanted to build and ended up with 4 candidates. I put them all in a spreadsheet with pictures and did some quick calculations and made comparisons to recommended space needs for coops and runs. I then allowed my wife to take a look at the 4 candidates and pick her choice on aesthetics. Well in the end you guessed it, your coop won out for me.
I then downloaded the Sketchup program and played around with it, figured out I didn’t know what the heck I was doing then went to the tutorials. After I got more comfortable with the program, I realized I was going to be in some trouble since by nature I am a perfectionist. What I noticed is the lumber measurements given in Sketchup all are based on 2X4s being actually 2″ X 4″ which they are not since they are 1.5″ X 3.5″. So I then went and checked all dimensions and found the same everywhere.
So I have a few questions.
1. Have you developed any other plans and if so, could you send me everything you have including any other pictures or details others may have submitted.
2. Has anyone noticed this and modified the Sketchup drawings.
3. As i proceed to building this, are you available by email to answer any questions or do I need to just post here.
Again, wonderful job with the write up and the design. And just wanted to say one thing I noticed. This has obviously become a big part of your life and I am extremely impressed how you have kept answering people’s questions for years and supported this wonderful hobby of ours. You guys are the best and I really appreciate the family atmosphere exhibited in the write up and your responses. Don’t see that a lot anymore in this world.
Stacy,
If you will download the Engineering Toolbox Plugin for Sketchup you can get the actual lumber dimensions instead of the nominal dimension.
http://extensions.sketchup.com/en/content/engineering-toolbox
I needed this because I’m taking Scott’s AWESOME coop design and adding a few extras that I have found that I like from other similar coop designs.
1) The bottom of the actual coop is a full slide out tray for easy cleaning.
2) Feeding and watering systems that are accessed outside the actual coop.
Hey guys. I’m building this coop, and am pretty excited about it. I have the walls up, as well as the roof. I just need to shingle it. I am ready to start framing in the hen house floor, and am thinking ahead to the nesting boxes. In the last picture in your Chicken coop framing section, you have a picture that shows the nesting boxes from inside the hen house. You note that the nesting boxes are up about 6 inches off the floor to allow for the DLM……..what is DLM? and why didn’t you just put the nesting boxes flush with the floor? I’m also wondering if you may have written down, or shown us readers, how you cut and built the nesting boxes.
Thanks bunches and your coop is awesome!!
Debora Cadene
Hi Debora-
DLM is “Deep Litter Method” – which is the pine shavings (or other bedding). The bedding is about 6″ deep, so you want the boxes to be level or at least a little higher than the bedding. Scott might have photos on the nesting boxes build- he’ll check for you later this morning.
Thanks Jaden. Having the dimensions, will fill in a few other blanks for me, and I can put my uprights in. My coop is only 5 x 10, but I made the hen house 4 x 5, so even though I ‘m only “planning” on a maximum of 3- 5 birds, I thought 3 nesting boxes would be better then 2…or would 2 be fine?
2 boxes should be fine for 3-5 birds.
could you please email me your plans? I downloaded them & the google sketch program, but I cannot get it open.
Thanks!
Scott;
Great design! I finished most of the framing today. Can you please tell me how much clearance you used on the doors with hinges (main, coop)?
How are the linoleum tiles holding up? Would you use linoleum sheet instead?
Hi Paul! I’ll let Scott answer re: clearance. As for the linoleum tile, they’ve started coming up – I think that even though the bedding is dry, our weather here in Florida is so darn humid that the tiles give up. We cleaned out the coop last month for Spring cleaning, and saw a couple of tiles come up. But it’s an easy fix, we still have a box of the tile, so we can just replace any that pop up. This might be easier than trying to replace an entire sheet.
I downloaded the SketchUp files and can open them. If they’re available, how do I view the measurements in this? Thanks!!!
I am unable to open the plans to print. I was wondering if you could please email me a file wih the plans.
Hi Melissa – Those are the only format we have. It’s in Google Sketchup, so you will need to download Sketchup to open it.
We are pricing out building a slightly larger coop but with the same design. Do you have an estimate on your costs?
With all new lumber, siding, metal roof and concrete work this coop cost between $1,200 and $1,800. I also had to purchase a few new tools to help with building. Biggest expenses are the metal roof and the siding. Going with alternatives to these can really cut your cost.
Hi im not to good on the computer but good with plans. Is there anyway to get the plans emailed to me. And what is the cost
Rick,
We currently do not have any plans drawn up. We only have the SketchUp files for reference. Sorry.
Scott
Jaden and Scott, I think we will have a flock of 10 and want the ladies to have plenty of room. As we have hawks, eagles, raccoons and fox, they will not have the run of the yard unless we are out with them, would you double the size of the coop? Also, building in Denver, CO so drainage is not an issue. Would you still recommend a concrete foundation? Thanks!
Laurie, The general rule of thumb for run space is approximately 7 square feet per bird. If they are Bantam’s you can go a little less. If you’re planning on giving them little yard time, you might want to increase it a little bit. Maybe instead of a 6′ x 12′ footprint, increase it to 8′ x 12′ footprint. The footing on our coop serves two purposes. One, like you mention, is to combat the higher water levels the area can get. But the other, and one that applies to your area, would be for predator protection. Raccoons, foxes and animals will try to dig into the coop. The footer prevents them for getting under, or at least a lot more effort is involved. You can also go with other means of protection like burying 12″ x 12″ x 1″ concrete paving stones in a vertical position beneath a layer of cinderblocks, or you can use a thick wire mesh or fence laid horizontally outward from under your base so when critters try to dig under they will run into it. Do not use chicken wire for this as it will fail over time. This type of protection is always easiest to install before the coop is built on top. Adding predator protection after the matter can be tough.
Can you send me the plans in a PDF format.
Thank you
I am going to start the project next week.
Will send you photos when finished.
Hi Andrew – the plans are available to download – the link is at the end of the post, right before comments!
Can you please send me the plans of this coop in your pdf file instead of the sketchup. We have chickens inbound this coming June and I want to start building a coop. Your design looks great and looks reasonable to build. I may have to expand the measurements just a bit as we are getting 9 chickens.
Thanks
Hi Tony – we don’t have a PDF version, just the sketchup version.
Great coop, and I was able to download the plans. I can’t find anywhere that has a materials list. Could you send it to me?
– I didn’t put together a materials list for the full project yet. I can give you some ballpark figures from what I remember:
2 – 14′ 2×4’s
6 – 12′ 2×4’s
50 – 8′ 2×4’s
9 – 92″ 2×4 wall studs for roof beams.
~20 – 8′ 1×2 furring strips (cheaper than normal 1×2’s)
~30 – 8′ 1×4 furring strips for trim work and roof (these were had rounded edges and were cheaper.)
1 – 3/4″ 4’x8′ plywood for floor
4 – 1/2″ 4’x8′ plywood for roof sheathing
6 – 4’x8′ shipboard siding (a lot was wasted and could have been used for nesting boxes.)
4 – 3/4″ 16″x48″ craft boards for nesting boxes.
1 – 6′ 1×10 for ramp
1 – 1/4″ 2’x2′ plywood board for door.
1 roll of 3′ wide 1/2″ hardware cloth.
3 rolls of 2′ wide 1/2″ hardware cloth.
6 large hinges for doors and nesting box cover
6 small hinges for window covers.
2 heavy duty latches for doors
4 buckle hinges for window covers and nesting box latches
10′ small link black chain
6 small snap latches to keep door locks closed and window covers open.
2 metal plant hangers for feed and water
4 metal eye hooks for chicken ramp
5 larger metal eyes for door rope guides
15′ small white rope
Various gutter pieces to make 14′ gutter with downspout and end caps.
10 – gutter mounting clamps.
1/2 cubic yard of granite rock for sub floor
1 cubic yard of sand for run floor
1 role of 3′ wide weed barrier cloth
linoleum for coop and nesting box floor
16d Galvanized Nails for framing
10d Galvanized Nails for toe nailing framing
8d Galvanized Nails for joining 2×4’s together back to back
1 3/4″ Outdoor screws to join trim and plywood to 2×4’s
2 1/2″ Outdoor screws to join 2×4’s together (eg to sandwich hardware cloth)
1 3/4″ Galvanized Roofing Nails
pop-rivets for gutter
Gutter sealant
2 cans spray paint for gutter
paint for coop
roof material and parts.
*** I’m sure I have overlooked some of the parts. Use nails for framing as they are good against shearing and use screws where you want to pull things together tightly like out framing and walls to studs. If your husband is proficient toe nailer then the roofing beam plates I used aren’t needed.
Hi,
we want to use your plan for a coop located at a preschool. How complete is your supply list?
we are attempting to cost it out and purchase materials, I would appreciate any information you can provide.
Thank you,
Mary
Mary, the supply list is fairly accurate. If costs are an issue, I would suggest removing the metal roof and use a cheaper substitute like shingles. Also look for a reclaimed building materials or architectural salvage store. Often times you can find cheaper materials with much more character there. Using reclaimed wall studs can be beneficial.
– Scott
scott. i was wanting to know how you extended the 2×4’s on the roof past the 2x4x12 out the the outer edge 2x4x14. did you just use toe nailing method to attach the extended roofing out the outer 2x4x14? i really appreciate your time
Cody, all of the roof rafters are 8 foot in length and will extend 1 foot past the walls on both sides. I didn’t use a wall header and just ran the roof rafters across from the wall uprights. You will see a picture that shows some of the rafters in place while I was building the walls. The piece along the top of the wall that runs the length of the coop is actually smaller pieces nailed in to the wall upright and rafter using both straight and toe nailing. The larger 2x4x14 is nailed straight into the end of the rafters. I decided to make the top of the wall this way to ensure there were no large gaps at the top off the wall and the roof to help prevent critters getting in the coop. Hope that explains it better. – Scott
Please help, I have downloaded both the zip files and the sketchup program…how do I marry the two? I have tried forever and cannot get anything but errors about incorrect path. If you got this to work how did you do it? Please help and thank you for your assistance.
Do you have a cost estimate for the project?
Cost of the project can range depending on the materials used, and if you used reclaimed items. If going with new materials it can pricey, upwards of $1000 or more. Choice of siding and roofing material being the biggest cost items. Going with reclaimed wood can reduce the cost associated with the project dramatically.
The coop is beautifully built. Perfect detail. Congrats. It’s exactly what I’ve been looking for. I’m unable to use Sketch-up, would you be so kind as to forward plans via email. Thanks! L.
Hi Linda – the plans are in Sketchup, so we don’t have them in any other format. Sorry!
How tall are your cement footings? Thanks!
Scott,
Thank you so much for the response. It is a little difficult to tell from the pictures, but did you use solid or semi-transparent? Also, do you recommend the oil or latex base? Thanks again for all the great detail. It is very much appreciated.
Cheers,
Andrew
Do you recall the brand/color/transparency of the stain that you used?
The Stain was Thompson’s Waterseal California Redwood Stain.
Just need to know what type metal roof panels you used and where you bought them. I clicked on the link ‘How to build a metal roof’ and it ‘did’ go to a website, but there was no such article on it. I already have a chicken yard built, but need to add the covering over it (12′ x 25′). Can you help me?
I bought the roof from Lowes as a special order. They have several styles to choose from and can help put together all the pieces you will need. I will look into the link issue shortly.
Scott
I only see the framing plans and they don’t have dimensions I am sure it’s an issue with the program I have downloaded. Can you send me PDF’s by chance? I am really excited about starting the project and so happy you are willing to share it’s a great looking coop.
Unfortunately I do not have the plans in PDF form. There is measuring tape tool in SketchUp that I used when building the coop (or at least there was in the version I used). Let me know if you can’t find it.
Scott
Scott
Can you E-mail me PDF’s by chance? I am really excited about starting the project and so happy you are still willing to share??It’s a great looking coop. I will modify as per some of the above suggestions. Manley a little smaller version, 2-4 hens.
Thank You
Do you happen to have a materials list for this coop? It is awesome but I wanted to know roughly how much money I was looking at for materials.
Thanks!!
This looks like an awesome chicken coop. I have decided to attempt building a chicken coop; however, I have almost no experience building things. Is this something someone new to “construction” can complete? Or would I be over my head in attempting this as my first big project? My husband will be able to help me some, but he isn’t home a lot so I think the majority of construction would fall to me. Thanks!!!
Could you e-mail the plans to me please i cant seem to get them! this is wonderful by the way i love how it turned out!
Emily – right at the end of the post – there is a link to download the zip files for Sketchup plans. Just click that link!
thank you!!
Please email plans…..i cant seem to print them! Thank you!
Do you know a round about cost that went in to building this coop?
Thanks for the great write up and plan!!! Built the coop last week that is virtually identical only larger in size. I really appreciate the attention to detail that you provided. My daughter and her family are a very happy group thanks to your generosity in sharing the plans. All the best.
Gary – that’s fantastic! We’re so happy you love the coop!
help, I downloaded the sketchup program but how do I download the plan???? Please help.
Pat
Hello, was wondering if plans could be emailed and if you would be willing to do that. Thank you, Samy
We do not have plans other than the sketchup files. If you need the sketchup files emailed to you, let me know.
Hi Jaden
I Love this coop design!
I downloaded Sketch up and was not able to open the files, said the were not sketch up files… Can you email them to me? Im picking up my chicks new week and need to get going…
Thank you
I emailed you the sketchup files.
I prepared the design of a chicken coop which is similar to your coop. In my coop design, I am not able to place nest boxes in my coop. Could you please tell me where have you placed the nest boxes. I mean off the ground or on the ground level.
Our Nest boxes are approximately 8 inches of the floor of the coop area to allow the use of Deep Litter Method. More specifically, they are on the outside wall so that we can access them without going into the coop. If you look at the very top picture on the post, the nesting boxes are on the far right side, just below the window. The top of the box opens for easy access. Nesting boxes should always be above the coop floor but lower the roosting bar or else the chickens will sleep in the nesting boxes and they will become full of chicken manure.
Hi,
I contacted you on this thread some time ago. I read that you can send a pdf file to fans of your coop. I’d be so grateful if you could email them to me too. I can only see the .zip sketchup files or maybe I’m just looking in the wrong place
Many thanks
Brendan
Hi Brendan – the PDF is downloadable on the post – look at the end of the post, before comments. Happy building! Jaden
Very nice plans and pictures. I am currently designing my own coop, and was wondering how the vinyl floor worked out.
How did you clean out the coop (broom, rake, hosed off with water)?
Are the vinyl tiles still holding up?
When you applied the tiles, was there any surface preparation done on the wood?
Was extra adhesive or fasteners used?
Do you have any suggestions for using vinyl tiles or things you would have done different?
Thank you for your time!
Mr. A
Hi Mr. A!
The vinyl tiles are holding up really well! We clean out with a big, deep shovel and a child’s garden rake. We only do this twice a year. The rest of the time, We just add more pine flakes as needed.
This is AMAZING compost. Twice a year, we shovel the shavings into a wheel barrow and it gets dumped into our garden beds.
When we applied tiles, there was not surface prep – however, it depends on the wood. If its rough and uneven, sand the surface (and then blow clean). You can add adhesive primer if you would like. But we didn’t and it’s just fine.
Different: The coop is solidly built. Absolutely not changes there. We let our chickens roam about on our property every day. So, every morning, they get let out. Every night, we put them up.
It’s not in the plans, but we had to create a “chicken door” for the chickens to go in/out of the coop. At night, we have to close the door and secure it so that the predators do not get into the coop.
One day, we’d like to make that door open/close automated via solar.
I’d love to try this and I think I’m ready to go. Its warming up a bit here in Ireland and I’ll get to work in February. Please send them to me. Brendan
Brendan – the link to download is at the end of the post!
Thanks for sharing your coop! Love your ideas! Especially love the run drainage plan. I definitely want to incorporate it into my new setup. My husband surprised me with a prefab coop for my birthday!! Excited to get started ! –Thanks again! 😍
Could I trouble you to email the plans and material list to me? Thank you!
on its way!
I didn’t receive it! May I ask that you resend? I check all of my folders, but can’t seem to find the email. Thank you again!
I love your coop. I am planning to get six chickens next spring and would like to begin building a coop very soon. Please send me a copy of your plans if you would. I may need to reverse your plans in order to locate it in the spot where I wish it to be. I will provide pics after it is finished. Thanks.
Hi Gary! I’ll send the plans this morning!
Hi that is a great coop was wondering if you would be able to send me a copy of the plans again that is super nice thank you
great design! you’re one of the few that have been generous enough to give their design to the public. thank you 🙂 i’m going to use this as inspiration if not duplication 😉
do you have any pictures inside that show the roosting bar and how that is figured into the design. i think i see a tiny portion of it but am not sure.
thank you again 🙂
~m
Hi, Scott and Jaden!
Thanks for posting your amazing coop design and I like reading all your posts on steamykitchen.com. Downloaded your plans and installed SketchUp–I’m off and running!
Couple of quick questions:
(1) Did you consider building your coop/run palace any bigger? We may have more than 10 chickens, so the plan will need to be changed to accommodate. I was thinking maybe 8×14 instead of 6×12. Any building issues you think that will create? I was also thinking about putting another coop on the left side, to mirror the one on the right. Overall run space might be a problem, though.
(2) Are your three nesting boxes enough? Seems like you could add another bank of three on the front in addition to the three on the side, if necessary.
Again, thanks for posting your coop! I’m building a scale model out of craft sticks to make sure I get all the construction steps and lumber cuts mapped out before I begin. I’ll keep you posted!
Mike
If you are having that many hens, you might as well make it bigger. If you’re like us, you’ll fall in love with adding baby chicks every couple of years (to replace those who have died or gone missing, which does happen.) We have a separate coop for the babies, but in a couple of months they will get old enough to be introduced into the main coop. I wish we made the main coop slightly bigger to accommodate a fenced in area for the “adolescents” — with fencing material big enough for the babies to go through (and get food water) but too small for the big hens. This allows the babies (well technically, they would be 4 mo old) to be a part of the coop community but also have a space that’s safe from bullying (bossy Oreo). Your idea of adding a second coop is perfect.
The nesting boxes are big enough. The hens lay on different schedules. But if you have 10 hens and are thinking of adding more, I would add more boxes.
We just have one main watering system, which is automated with a hose and a poultry (and dog) water thingymajigger that adds more water when levels are low – but through the turned-on hose that’s attached to it (but only releases water when water levels lowers to a set point). I never have to worry about water.
Would love to have a copy of the plans and supply list. Your coop is AMAZINGLY!!! Thanks so much (:
sending now 🙂
Love love love this coop!!! When you have time will you please email me the plans & supply list. We have searched and searched and your coop is by far the best I’ve seen. Amazed!! Thanks so much (:
Hello there,
What a fantastic coop, and what a fantastic job. I would be most grateful if you would consider emailing me a copy of the plans – and then another one could be built, this time, in New Zealand! Thanks for your informative page.
Yes! Will send when we get home
I have been looking for chicken coop designs for sometime, and at last I found!!!!
I am greatly impressed – you did a very impressive job. Yours is exactly what I’ve been thinking of and will fit perfectly by my property. May I please have the final plans? As this will be our first chicken cop, and making from the plan would be much easier than pictures.
Thanking you in anticipation.
With best wishes,
Rami
I have 5 hens and need a new coop design because I am finding rat snakes in the coop. Have you had issues with snakes in the coop? I don’t want to share the eggs.
Thank you so much Jaden..
Gary
I just went back and read all the posts and I see you don’t have a PDF, I am sorry for bugging you but I do want to build your design. I also see that you have been inundated with plan requests, if it’s not to much trouble could you email me a set. I could not down load the finish plans at all even with sketch up. Thank you so much for sharing you design. I live in Indiana and I also plan on insulating the coup using 1 1/2 inch foam and paneling the inside. Thanks again, Gary
No problem! I’ll send today.
I just built the exact same coop off of your pics. I have 8 hens in there now and they love it. Modified it slightly to cope with our brutal winters up here in Canada. Great job, I picked this design as it was the best looking coop i could find on the internet.
Cheers
Thanks Matt! Hope the gals like their new home. How are you planning to handle water, feed and overnight sleeping during those cold winter months? Would love to hear.
Scott
I plan to insulate the roof and hang 2 heat lamps. I will also run a horse – water feeder heater so their water doesn’t freeze. The 2 lamps will give me a back up in case one fails. I will just have to keep an eye on them (i always do anyways)
Thanks for this information! The coop is an excellent modification of the Wichita Cabin Coop and fits our needs well (as we ended up with 7 instead of 5 chicks)! Looking forward to breaking ground this weekend.
Hello – We live in Johannesburg, South Africa and my wife and our two daughters are desperate to get chickens. This is without doubt the best coop I have seen. I tried downloading the framing file, however my computer cannot open the .SKP format it is saved in. Do you happen to have the full set of plans etc in PDF format?
Kind regards
Henry Playne
Hi Henry – we don’t have it in PDF. But you can open the .skp format if you use Google Sketchup – http://www.sketchup.com
The .skp file format is for Google’s free SketchUp program. You can search for it on google and download the 3D drawing software for free. we do not currently have any plans in PDF format.
Hello! Loved your version of the house for chickens. I want to build this at home. One of the files downloaded prelimframing.skp, and the second can not download. Please send a detailed drawing of the house, I will be very grateful to you. Your home for just a cool chick!
I love the coop but cant get the plans cuz i cant open the file can you email me the plans Please? You have DONE A WONDERFUL JOB!!!
I really like this coop, you did a great job. I was wondering if there is a way to lower the highest part of the roof to 6′ as here in Jacksonville, Fl, our city ordinance doesn’t allow for anything higher that that. Awesome coop!
Absolutely Tom. Lower the highest point down to six feet. Make the lowest point of the roof at 5 feet. It will still give you a good run off. Drop the floor of the coop portion down to 24″. This will still leave approximately 3-4 feet for the coop portion inside. You may need to shrink the nesting boxes height down a little, but the girls should be fine. Just keep the roosting bar higher than your nesting boxes otherwise they might get confused on where to sleep. Another option might be to trim the roof such that there will be no overhang on any side (I would still use a gutter on the low side). I liked the look of the overhang, but it doesn’t really provide any additional shade most of the year. This would save you a couple more inches if it’s close.
BEST coop I’ve seen! So well thought out and looks tough enough to last! The downloads are .skps, is there anyway I can .pdfs as well? Thanks so much for sharing the pics – so great!
Hi James- we don’t have them in PDF format. I’ll have to look into converting them when I get back home.
I am also totally impressed – you did a great job. Yours is exactly what I’ve been thinking of and will fit perfectly by our horse barn. May I please have the final plans? This is our first time with chickens and we are getting about 1/2 dozen hens about a year old, australorp, aracunda (easter egg turquoise blue eggs) and some australorp aracunda crosses. Hopefully we will be ready in 2 weeks. LOL I’ll keep you posted. 🙂
Wow! I’m really impressed, and love that you did this in Sketchup! May I get the final plans?
Thank soooo much!
Jay
I’ll send it in just a sec!
Can you pretty please send pdf files. Id really appreciate it, and my girls too.
I am having issues opening the skp file, can you please email me the plans in a different format. Thank you!
Just sent!
Hi could you send us the plans and supply list. We too tried to download it, but cannot get Sketchup to work correctly. We look forward to getting our chicks into their new home.
Guess the link didn’t show up with the comments, anyway, here it is https://picasaweb.google.com/106442893418683154417/ChickenPalace?authkey=Gv1sRgCKOz1bqxttHm1gE
Just wanted to say thanks for the outstanding design. It was a lot of fun building. Ended up with right at $1400 in materials and about 8 days. The chicks are still being brooded in the garage for a few more weeks, but looking forward to seeing them in their new home. Thanks again for putting these plans together and for sharing them. A couple of pictures can be found at the link above.
Fantastic!!! I will show Scott and the boys when they get home
Hello,
I would really like a copy of the plans/supply list for this coop. Its exactly what I am looking for! I tried to download and my computer wont support the file type. Your coop looks excellent!
Amanda
Great plans, although I am wondering how do you clean the poop and seed(droppings) from the rock floor? Does it work down into the rocks and clog the drain holes? Still an awesome design!
We rake the sand once in a while, but other than that, it really doesn’t need any more cleaning – the poop decomposes.
– I didn’t put together a materials list for the full project yet. I can give you some ballpark figures from what I remember:
2 – 14′ 2×4’s
6 – 12′ 2×4’s
50 – 8′ 2×4’s
9 – 92″ 2×4 wall studs for roof beams.
~20 – 8′ 1×2 furring strips (cheaper than normal 1×2’s)
~30 – 8′ 1×4 furring strips for trim work and roof (these were had rounded edges and were cheaper.)
1 – 3/4″ 4’x8′ plywood for floor
4 – 1/2″ 4’x8′ plywood for roof sheathing
6 – 4’x8′ shipboard siding (a lot was wasted and could have been used for nesting boxes.)
4 – 3/4″ 16″x48″ craft boards for nesting boxes.
1 – 6′ 1×10 for ramp
1 – 1/4″ 2’x2′ plywood board for door.
1 roll of 3′ wide 1/2″ hardware cloth.
3 rolls of 2′ wide 1/2″ hardware cloth.
6 large hinges for doors and nesting box cover
6 small hinges for window covers.
2 heavy duty latches for doors
4 buckle hinges for window covers and nesting box latches
10′ small link black chain
6 small snap latches to keep door locks closed and window covers open.
2 metal plant hangers for feed and water
4 metal eye hooks for chicken ramp
5 larger metal eyes for door rope guides
15′ small white rope
Various gutter pieces to make 14′ gutter with downspout and end caps.
10 – gutter mounting clamps.
1/2 cubic yard of granite rock for sub floor
1 cubic yard of sand for run floor
1 role of 3′ wide weed barrier cloth
linoleum for coop and nesting box floor
16d Galvanized Nails for framing
10d Galvanized Nails for toe nailing framing
8d Galvanized Nails for joining 2×4’s together back to back
1 3/4″ Outdoor screws to join trim and plywood to 2×4’s
2 1/2″ Outdoor screws to join 2×4’s together (eg to sandwich hardware cloth)
1 3/4″ Galvanized Roofing Nails
pop-rivets for gutter
Gutter sealant
2 cans spray paint for gutter
paint for coop
roof material and parts.
*** I’m sure I have overlooked some of the parts. Use nails for framing as they are good against shearing and use screws where you want to pull things together tightly like out framing and walls to studs. If your husband is proficient toe nailer then the roofing beam plates I used aren’t needed.
Thank you very much! Ganna start this week!
Pat
Really liked many of the features that you included in this coop design. If you could please send me the second finish framing file and a materials list it would be so much appreciated. Thank you so much for the very detailed account of this project from start to finish. I found it both helpful and educational. You should be very proud of this project. It looks great is quite structurally sound! Looking forward to building one for our Buff Orpingtons we pick up tomorrow morning.
Thanks,
Tim Stinnett
Hi Tim – We’ll send it via email!
Yikes! We just had freezing rain and now the high temps will be in the 60s this week. I need to start on this coop/palace! Could you send me the same? Thanks!
Your coop design is DEFINITELY the best one that I have come across online. Exellent work! If possible I would also like a supply list. Thanks for your time.
Love it! Can I also get the supply list? Thanks
WOW. That is *gorgeous*. Well played!
Great coop!
We can’t wait to get started on the project!
We were able to download the two sketch up files, thank you! My wife put her tech skills to use and was able to figure some dimentions to get us started.
I hate to ask the question that everyone has asked over and over…but, do you have a list of materials that were used in the project?
thanks so much for the post!
Pat
Yes! Scott will send as soon as he gets back. We’ll have to find another way to upload the files so that everyone can download!
Thank you so much!
Sorry to be bother, I didn’t receive the materials list email from Scott…if he is still away no worries I can be patient…er.
Thanks so much,
Pat
Hi Pat! I’ll send them again when I get home!
I just finished leveling the site for my chicken palace. I was able to open up the sketches – I didn’t see a materials list – was a list available? I checked out the Back Yard Chickens website – yours is still my favorite design. I can probably figure out the lumber dimensions from the Sketchup plans; however, a materials list would speed up the process. Just wanted to make sure I hadn’t overlooked anything. Thanks! Love your website! We’re also trying out some of Jaden’s recipes.
I tried downloading the framing file, however my computer cannot open the .SKP format it is saved in. Do you happen to have the file in PDF format?
Will send tomorrow!
I’d love to have the pdf files for this project too. Its the best one I’ve seen on the net. I think I’m gonna tackle into something along these lines for my new coop which will be ready by the summer.
Many thanks
Thanks Brendan! The downloadable link is at the end of the post. It’s a zip file.
Email. E the plans mmann@wmcs.com please
Will do! Scott will send in morning.
Excelent work; I have taken several o your ideas for our coop. When it´s ready I will send them too you. We are in the Venezuelan andies and have lived in the country for over 35 years, and I have nevers seen somethng like your palace. Great job. FELICITACIONES DESDE VENEZUELA!!!
Great job, but is a $2500 (?) chicken house worth the trouble? Is there really a website called: BackyardChicken.com Go figure
Thanks Scott. 🙂
Any other tips you’ve thought about after posting these great photos?
How about any other drawings for Sketchup, any files that will be helpful?
Have you had any bowing of the flat 2×4’s, since completing your project?
Thanks for your sharing methods of building your coop.
Cheers!
We haven’t had any issues with warping or bowing of the 2x4s. I haven’t made any additional sketch up files since construction finished. The only thing we have added is a small drawbridge style door to let them free range when the garden is between plantings. And as always with chickens, clean water and clean coop are a necessity.
Looking at the different stock widths of 1/2″ welded mesh, what width did you purchase, for the majority of your coop project? 2′ 3′ 4′ or…
Cheers!
I used 2 foot width for sides and 3 foot width for ends.
Hello Scott and Jaden
Like you I’ve been researching chicken coops on line for quite awhile and it’s not easy finding one to fit my needs. I ran across your site showing construction of The Palace Chicken Coop and it’s perfect for what I’ve envision for our first coop. I was curious if you had the plans and materials list for this coop you could email or for purchase or is it necessary to download Googles Sketch Up program? Thanks and enjoyed reading your article.
Eddie
Eddie, I only created the drawings in google’s SketchUp program, so it would be necessary to download at the least the viewer from Google as well as the coop files from the links provided.
Scott
Great job on the coop- I’m very impressed! Having seen tons of plans and homemade coops on BackyardChicken.com, I think you could definitely sell these plans with a parts list. Just a thought.
Thanks for all the info and great pictures. Still have some finish work to do, but just moved them in! Now we need more…
http://i.imgur.com/sSKdMgG.jpg
We love it! The boys are here with me and are impressed! They love the horseshoe 🙂
Really awesome job building your coop! I’m currently building the same one up here near Boston and have a quick question about the finished framing. Are those 2x4s that were used for the finished framing?
Cheers,
Kevin
This is really awesome! Do you create a lumber list and plans? I don’t know if I could build in my neighborhood but this would be a dream of mine! Do you eat them or just use this to get eggs? Just wondering!!
We have fresh eggs everyday! At end of post, there is a link to the plans.
Love your coop!!! Could you please email me plans with dimensions and a materials list for lumber, hardware, etc. I opened your sketch up file which is cool, just need specifics to start building a home for my 8 baby chicks!
Thanks
Can I get copy of lumber list and plans as well. I love this coop you did a great job.
Hello,
This is exactly what I have been looking for! 🙂 This is beautiful and I hope to be able to recreate here in MN. The detailed photos and descriptions of your experience will be a great help when we begin to build our coop. Can you please email me the plans and materials list too?
Thank you!
I have added new download links at the top of the post. You should be able to save the SketchUp files from there.
I am in the process of building a coop and discovered your plans. Unfortunately I was unable to download the plans and would appreciate any help you can give me. Thanks
and material list?
Hi, same here I tried to download but couldnt, can you also send me the plans?
Thanks
No problem! I’ll have Scott send it later today.
I got the plans some time ago – was able to look at them using SketchUp. However, I didn’t see a materials list. Is that available separately? This is the best looking, most practical coop I’ve seen. I plan to make it my winter project so I can be ready for chickens in the Spring. Just need a materials list to help me figure out what I need to pay for the project. Thanks!
Bill
Cool plans and very nice article. I’ve been trying t get a feel for the scope of the project and this painted a very nice picture. Would you be so kind as to email me the plans and material list?
Hi your coop is GREAT, it’s the only one we love. Can you please send me the lumber list and plans. We weren’t able to open your plans. Looking forward to building this great coop for our chickies. 🙂
Nice work! It really shows that you put a lot of time and effort into The Palace. I’d really like a copy of your design. Thanks for sharing…
I have been searching along with my husband for the perfect oneand found it! I am having a problem downloading your plans and wondered if you could email them to me along with your material list ?
Thank you in advance!
could we have a copy of your plans! this is exactly what we are trying to build…. our current coop is too small ( we were newbees and obviously have different thoughts than the person we got info from ) thank you
Could you please send me the plans. Thanks
Would love a copy of your plans, thanks
Hi, I really love your coop, i’ve been looking for coop designs for two days and i finally found it. I see where you have emailed the schematics and lumber list to other chicken enthusiasts, If you could extend the same favor to me i will be very gracious. Thank you very much.
LOVE THIS!! Can you email me the plans and the materials list please? Thank you
Hi
The best coop on the web
Could you email me your plans
No problem! I’ll send it later today.
Hello there i went through and looked at this coop. I have an organic farm and would like to add chickens. Would it be possible for you to be able to send me a copy of those plans with material costs and dimentions etc…I would love to build one on the farm for chickens. Thanks John
Will you please send them to me also ?
Hello,
What a wonderful coop! You did an amazing job. I’d love to get a copy of the plans too if possible. : )
Thanks so much,
Christina Sergy, Long Beach, CA
Ditto…loved the whole thing. Could not get link on website for plans to work.
Could you also send the plans- bill of materials?
Jim
I love this coop. I would really appreciate a copy of the plans. Great job.
I love this design. It is very well thought out and constructed. My wife saw this and decided right away that we needed chickens and that I needed to build this. The chics will be arriving the week of July 15th. If you could email me the plans that would be a huge help. I tried the downloaded zip file but had no success with opening them. Thank you for posting the pics and sharing your story.
Thanks for taking the time. I used to have chickens before I tore the barn down to build a wood shop. I miss the goats and chickens. Not enough room for a goat barn now, but your chicken coop will fit in nicely. Yours is the best design of all that I have looked at. It is also pleasing to the eye. The SketchUp plans are a real help as well. I use SketchUp in the shop. Thanks again
Regards,
Bill
I LOVE this coop! I would like to get started this weekend if i can… I would be so grateful if you could send me the plans and materials list…. You guys did such a beautiful job!! 🙂 SO excited to make the girls a new home!
I would absolutely LOVE the plans for this. I really plan to do this next week! Thank you SO SO much for this! You rock!!!
Beautiful job! would u please send me the plans vis email. My girls will luv this! Thx…
Could you please send me the plans to this gorgeous chicken coop! I have looked everywhere for something like this. It is practical easy to clean and beautiful. My brother-in-law is going to build it so any tips you might have would be greatly appreciated. Thanks so much!!! 🙂
Hi just wandering could you send me the free files for the coop? Does it include a list of material needed?
Love your design. Can u email me the plans?
Please send me the plans to this gorgeous chicken coop! I have looked everywhere for something practical, easy to clean and beautiful! Ths is it! Thx
Awesome! Could you send me the plans please?
Regards,
David
david.longley@gmail.com
Great stuff! So many wonderful features. Could you please send me some plans and materials list?
Thanks!
Paul
We love this coop!! Please send plans and the materials list. Thank you!
Jaden, I love the design of this coop after scouring the internet for a design that had what I was looking for. Our babies arent quite ready to be put outside yet but I would like to get started on ordering materials and gathering supplies together. To this end would it be possible for you send me a pdf file of the plans to the above email address? A list of materials would also be great if you have one. Thanks so much for taking the time to help us out!
Great job! Could you send me your plans please?
Regards,
David
Jaden…Got the plans….Thank You ever so much!
Got the plans today! Thank you!
We love your coop! We have been looking for one just like it. Can you email me the plans and a list of your lumber supplies? Also, an estimate of how much it may cost? Thank you so much!!!
I love this coop!! This is exactly what we wanted. Can you email me the plans as well? I tried to open the zip but it is not working. Do I need the program you used to see the plans? Also, does it include a supply list of lumber and parts? And do you have an estimate of how much it cost? Thank you so much!! Love it!!
I sent them! It cost about $1,500 but that number could be so much lower if you used recycled lumber and no metal roof (use shingles instead)
The metal roof alone was $800.
Concrete rock and sand was $350 – you don’t necessarily need concrete- we needed it because that are of the yard tends to flood and we had to raise the floor.
Without the concrete and metal roof you could make this coop for $600.
I will be starting on this coop probably this weekend! I am not a novice builder but not an expert either. Would you mind emailing me the plans and anything else helpful you may have as well please? That would be great! Thanks – Nate
Jaden/Scott
Could you send me your plans; I am in the process of building (from you pictures..not quite as easy as thought); Plans would be a life send!! Thank You!!!!
Hi! I sent the plans a while ago, will send them again. Let me know if you get them!
That would be great to have these plans…thank you so much
I’ll send everyone a copy of the plans today!
I would love to have the plans for your chicken coop.
Thank you,
Gina Cattell
I would like to get a materials list if one exists. I’m going to bribe my DH (a carpenter) to build this coop for me and my girls! 🙂
Gudday, I love the coop. It’s very well designed and constructed. Just what we are looking for. I am also having difficulty downloading and opening the plans. Would you mind emailing me the plans and a materials list.
Regards, Graham.
This is exactly the kind of coop and run I have been looking for, I would love to also have a copy of the plans and material list if possible.
We have been looking for a set a of plans for a chicken coop. This one is one we have agreed. We like the most. Could you email us a set of plans and materials list?
Hello, I love the coop! It’s appears to be very well designed and constructed. I, though, am also having difficulty downloading and opening the plans. Would you mind emailing me the plans and a materials list, if you have one? Thank you!!
Hi, I too have been searching for the perfect chicken coop for my Grandaughters chicks and I have finally found it! Your coop is not only visually attractive it appears to be very well constructed. I am having trouble downloading your plans and am wondering if you could email me the coop plans along with a lumber list?
Thanks!
Carrie
Hi! I love the coop and have been looking for the perfect one for some time. I am not able to download the plans from the link above And wondered if you are willing to share your coop plans and lumber list?
Thank you
Pam
Hi there! i have been looking at your coop for an hour now and have been searching along with my husband for the perfect one! we found it! I am having a problem downloading your plans and wondered if you could email them to me along with your lumber list? Thank you in advance! We are in Florida too! South Florida. 🙂
I love your coop, though it is much more elegant than I am ready to build. However, the framing is perfect. Could you give me your actual dimensions? Or material list for just the frame?
hy , i love your coop want to build like ur plz send me copy of paln thanks
regard
bashir shah
What a gorgeous design! I’m curious to know what it’s been like when you have to clean it–do you wish you adapted your deign at all? Did you have any problem with moisture seeping between the sandwiched wood and hardware fabric? Lastly, do you let your chickens range at all, or are 100% captive?
Thanks!!!
Susan Shortill
Hello –
What a beautiful coop. I have been researching online quite a bit (4 hours today alone!)… I really love your design and would like to replicate it/use it as the base for our run/coop. I know that people asking you for plans for all of your hard work is probably getting old, but if at all possible I would love to have them as well. Also, do you know approximately how much the entire build cost? It is important to us that we have a good looking/fully functional coop. We live in an urban area, but would not want the hens to suffer!
Thank you in advance!
Alisha & Joe
Hi Scott,
this coop looks great.
i too, cannot open the files, would you be able to send plans and materials and measurements list for all pieces.
Thanks so much!
I went to the Sketchup website and downloaded their free program, then downloaded your zip file via the link above. I only see drawings of the coop. If you have something different (materials list, measurements for all pieces), it would be great to get those via email. Thanks!
I think this is the coop for us! Could I please get an email with plans? Great Job!
The coop looks great. I have been unable to un-zip the drawings. Could you possible e-mail me a set of pdf drawings? Thanks.
Wow, you did an AMAZING job! I too can not open the plans. If you don’t ming, could you please email the pdf version? We are very excited about moving to a nieghborhood that allows chickens and can’t wait to get started!
Thanks again for sharing this wonderful design and work.
Bree
I plan to build a chicken coop as well and your design looks great. Tried to open the plan but no luck at all, can you please email me the plans if you don’t mind?
Thanks
Plans look great; would you mind emailing a copy
wow!! that is one sweet chicken coop!!! would also love the plans if not to much trouble!! how much did this cost to build roughly? thanks so much!!
he coop looks awesome. I am going to build a coop and would like one like yours. Could I also get a copy of the plans?
I love this coop. If plans/material lists are available, I would like to get a copy. Also curious as to the cost of the Palace. This is the perfect size for our backyard. Great design! Thanks in advance!
Me too! I love your coop and would love copies of the plans and a materials list..please.
Hey Scott – Well done! That is magnificent work. I’m also keen on seeing your sketches, if possible! Cheers.
Quick question on materials used. Was the wood used in the construction of the coop pressure treated lumber, and if not how has it held up to weathering?
Scott, starting this project this weekend, thanks for doing all the groundwork.
Any way you can email me your plans? For whatever reason, I’m not able to “un-zip” them.
Thanks in advance.
Scott, I was able to get the zip but just had the sketchup drawings, do you have the lumber list and actual plans you could email me please. Great looking coup.
Hello, can you please email me a copy of the plans and the supply list for your coop/run. I think it’s the best I’ve seen. Thank you.
Love, love, love your plan. My husband and I have two rhode islands reds and are so excited about building a palace of our own for them. Would you please email a copy of the plans and material lists? Thanks so much for the photos and info. You did a great job!!!
Love these plans, they combine everything my husband and I are looking for in a coop and run. Could you please email a copy of your plans (and any other supporting documents)? Thanks so much for your post, I am very excited to get started on this!
Scott,
Can I get a copy of your plans, materials list and whatever else you have to support such a build. I have been researching coop designs for quite some time and your design is exactly what I have been looking for. Great Job! and Thanks in advance.
Scott, I too was wondering if I could get a copy of the plans and a materials list if you have one? Also just curious as to how much this project cost for you guys to build it? The coop looks awesome. It looks like it took a while to not only build it but to write it up as well so thanks for all the time you put into this.
I have studied all the different options for a backyard chicken coop & have decided that building one like yours is our best choice. I am very impressed with how well you built it…it looks great! We are unable to download the SketchUp models you refer to. Could you please email them to me or plans if you have them?
Thanks so much!
L.C. Williams
Hi Scott, I really like your chicken coop palace. Can you send me the plans please before my friend changes his mind in helping me build it. Thanks!
Great design for cosmetic appearance and access. Could I also get a copy of the plans? Thanks!
Curious as to the cost of the project? Also, is it possible to get a materials list? Thanks!!
This is my big spring project! I too would like a copy of your plans and lumber list! I’m a “do it yourself” novice so i need all the help i can get
I love yoZur coop, however like others, can’t get ZIP FILES.. would you please send them to me also. Thank you
Hi Scott. This is just the type of coop my husband and I have been looking for! Can you email me the plans/materials list? Thanks!
Great coop scott. I definitely want one like that at my house. I’m also having problems with the ZIP files, so could you please email me the files as well
Thanks
Kyle, Tim and Teresa – I sent the files via email. Have fun!
Hi Scott,
Love your chicken coop! Would you mind emailing me your plans as well? Thanks!
Scott we also had some trouble with the zip files. We will have to make a few alterations due to us living in a Kansas climate but love your Palace. We have researched several other plans and we are going with yours. Please send me via email your plans we are planning on building by March/April 2013. Thanks for having your great plans online.
Awesome coop! I would love to copy itand materials list. Can i get a e-mailed copy of the plans and materials used? Thanks
Awesome coop!! I am getting ready to build one myself and would love a copy of your plans, materials or anything you have available. I could not get the zip file to work. Any help would be greatly appreciated! Thanks!!
Awesome coop!! I am getting ready to build one myself and would love a copy of your plans. Had trouble accessing them via zip file. If you could email them to me that would be great. Thanks
great coop…unable to download zip files…i willing to pay for copy of your plans and lumber list, thanks
I will email them to you.
Very nice work. I would love one of these in my yard.
Loved your chicken coop and would like to copy it in my backyard. Do you have dimensional plans/drawings and materials list for this coop that can be downloaded to my email address. I would greatly appreciate it even if you need to charge for this service.
Thanks,
Bob
Awesome coop, Scott. I also could not download the plans. If at all possible, could you send the files in a PDF? I look forward to hearing back from you and begin building your design. Thanks
Great Coop Scott. Tried to download the files but couldnt access them once downloaded. Do you have the files or parts list compatible for a PC? Email me 🙂
Love the design …..could you explain your routine of cleaning the cage?…..do you hose the sand down weekly and how about the nesting boxes?…thanks very much…..Jikky
Cleaning the coop consist of raking sand with leaf rake and running collected mass through a 1/2 wire mesh screen. The sand falls through and the solids collected are dumped into our compost bin. We rake the sand level again.
We use the Deep Litter Method for the coop itself. Using pine shavings and some food grade diatomaceous earth we create a 6 to 8 inch layer on the floor of the coop. Every few weeks we add about an inch of pine shavings to replace what has decomposed. Every six months, we completely empty the coop and place all of it on the compost pile.
The nesting boxes have about a 2 inch layer of pine shavings.
Love the chicken coop. Would you please email the sketches with measurements so I can build one.
Thanks
The coop looks wonderful but I can’t seem to access the sketches. I would love a copy of the plan if possible. Chickens are the greatest!!! Could you email the plans. Thanks
Terrific step by step! wow! Lots of time and research are apparent here! Thanks so much for sharing. I would also greatly appreciate the details and plans..
loved the “our first egg” blog! I’ve been anxiously awaiting the first one too..
Thank you,
Judy
Hi Scott,
Thanks so much for sharing your chicken coop research, the step by step process of how you built your coop as well as the sketches of your carefully built palace. We are about to built our first coop and would greatly appreciate if you could share your measurements and get us started in the right direction.
Happy chicken farming to you and your lovely family:)
Great chicken coop design would love to build it but was having trouble with your zip files . could you send the in a email for me .
Thanks for your help .
Matt
The chicken coop looks great. I am looking to build one. Please send me detail plans if you have some.
Thanks,
Anthony
the chicken coop looks great. I am looking to build one would you please send me the plans?
Thanks,Phil
The coop looks great and very thoughtfully put together. I would love a copy of the plans or google files if they are available. Planning to start building in early September and this would be a great basis to start from.
thx!
The coop looks wonderful but I can’t seem to access the sketches. I would love a copy of the plan if possible. Chickens are the greatest!!! Could you email the plans. Thanks
What about the chickens getting fresh grass and bugs. Why not save the money on sand and let them graze on grass. But nice coop. Simple building will work just as fine though.
We would like the plan specs. you used for the palace. Very nice job. Our girls would also like one. Thanks in advance.
Love your coop. I’m getting ready to build something similar. What color/brand stain did you use? I can’t seem to find the look I like. Thanks.
That is a great coop. I have one made from arched pvc wrapped in chicken wire. The girls seem to like it enough, but I would love to do something like this. Do you still have the sketchup file? I love the design. I might try to lighten it up a bit and put wheels on it to have a luxury mobile home for the girls instead of a foundation style palace. Great job though.
The best plan i had ever seen thanks dear… ♥ ♥ ♥
We are going to give it a go and make something similar here in Australia. Just wondering if you can remember what size lumber you used for the structure?
I don’t have a detailed set of plans per se. You can click on the link to download the SketchUp files. The free version of SketchUp from google has great tools to help measure and look at different pieces in the coop. As far as price goes, the coop ran about $1500. Of course cost can be reduced by using re-claimed materials, or exchanging metal roofing for a less expensive alternative.
Wow great coop. i would love the detailed plans for them. also would you be willing to give me a rough idea of how much it cost
Wow. Great post. I’m looking to built a very similar coop in North Florida. Any plans, ideas or general words of wisdom that you’re willing to share would be much appreciated and well received. Thank you for posting this great article. Very nice.
This has been really helpful. Thanks a lot
Wow, well done Scott! On both the coop and the post. I started building our coop last weekend but it won’t be nearly as fancy. We’re on a tight budget so using reclaimed wood, but it’s really a LOT of fun. I love woodworking and power tools 🙂
Hi Scott,
I’m so impressed! I’ve also been playing with Sketchup to design my coop. Talk about learning curve. (cf. http://blog.bolandbol.com/2012/03/26/fun-designing/) I’d love to quit messing around with it and base my design on yours. Could you email me the plans?
I love your idea for slanting floors and I’m also going to rethink the drainage.
Thanks so much for sharing!
Kaat
your plans for the chicken coop is outstanding. I would love to receive the 3d plans
starting chicken farming and love your palace would appreciate the plans as am starting to build soon,ill keep you posted on progress
Hi Scott & Jaden,
Its been a while since I’ve seen or talked to you. Looks like everything is going great and I’m so excited for you.
Great chicken coop. My husband and I have been talking about getting some chickens but we’re in a residential neighborhood and not sure about the chicken laws. Of course we haven’t really checked but I would love the plans if you could email them. Would give us some incentive to act on our ideas.
Thanks. Susan
If my husband can build houses, wonder if he’d build this for our back yard. Looks really nice…good work hubby!! Now lets take it to the house baby..
Holy cow. I thought I’d built the chicken mansion. That is a serious coop. Ha! What is the plan once the wire rusts away? And what keeps varmints from sneaking in through the egg door?
I would like the 3d plans from google sketch, if you wouldnt mind sharing ? I really. really like the way you built your coop ! well thought out. thanks, clint…
This is exactly what we have been looking for!! Thank you for the info! Would love to have plans if you have them!!
Cristy,
I tried to email you a copy of the sketchup files to you, but the email address you used to comment gave a delivery error. Please use our “Contact Us” form with another email address and I’ll try again.
Scott
OMG….. I can not get over what a Fantastic job you did and sharing this info w/everyone is so wonderfully generous of you.
I would just want the adorable chicken coop in my yard even if I had no chickens…..
. I bet there are other animals that could be happy in there too, such as a rescued bird that couldn’t fly any more, baby squirrels that fall out of the nest, etc.
Just a total, gigantic WOW, WOW, WOW factor here. What Talent!
LOVE every inch of it.
Scott…what a great job on your chicken coop…very professional! Your “girls” must be very happy!
Jaden…there is a wonderful book you might enjoy…Free-Range Chicken Gardens by Jessi Bloom. Lots of ideas and information to go along with your chickens and their new home.
Hope the boys are doing well…
Wow…fantastic…superb! Really admirable…you really made the idea of raising backyard chicken and fresh eggs so attractive and fun and wow!! Really can’t be called a chicken coop but a palace! I would build one if I am not already in my senior years! But who knows!
Those are some spoiled chickens! I love the coop! Great job!
Great looking coop! Looks like quite a project. Our coop is much smaller and portable so we can move it around the yard. What’d you do with your old coop?
Great job! I wondered if being in Florida you have issues with snakes and if so how do you keep them from the chickens and the eggs?
If I may, I have a super easy suggestion that you can add to your chicken coop.
If you take a long PVC pipe (thick or thin enough to fit between the chicken wire walls) and place it in the corner of the chicken coop, your chickens will LOVE to perch on it.
My chickens loved to do this and would perch all day 🙂
Awesome article, thanks for posting and looking forward to more.
Awesome! I love the chicken coop. Great ideas and I wished I had a place to keep chickens because I use so many eggs in my food.
Wow! That is a masterpiece! We had chickens growing up, but their house did not look anything like this!
Your chicken coop is nicer than our barn. 🙂 This post, and that coop are both awesome!
Thinking about building this for my new chickens. Can u tell me estimated cost? And email plans?
I just started reading your site and I love the family joining in. Jaden, both you and your husband are great writers. It’s warming to read your site.
Use our contact form and leve your email address. I’ll send them out as soon as I get it. – Scott
What lucky chickens! Because aren’t lucky enough to be back yard chickens they live in a pen with an old grainery that used to be my goats barn. Enjoy your flock!
Great job! My husband and I were just discussing the addition of a chicken coop to our property. Would love to have the two SketchUp files you mentioned. Thank you!!
Wow! You did a tremendous job!
As an ex-building inspector from RI that gets hurricanes, now retired to HI, and you living in FL that gets a heck of a lot more hurricanes than RI if I were you when I poured the finished footing I would have embedded L-shape ¼ to ½ inch anchor bolts into the finished footing every so many inches for hurricane protection to bolt down the framing sill plate. Nothing like a lose 900 to 2,000 pound chicken coop flying off on you in a hurricane crashing into your house like a guided missile!
Hawaii learned its lesson on Island of Kauai when Hurricane Iniki CAT-4 hit taking almost every roof off on the island and demolishing every chicken coop that was not anchored down. The flying coops did a lot of building damage! The Island of Kauai island bird has now become the chicken even up on top of the mountains! They are everywhere you go and the roosters sing their songs daily everywhere at any time!!!!!
WOW! I’m impressed with this project! I miss having my hens so anytime you feel you have time you can come up our way and build this in our backyard 🙂 It looks absolutely perfect and you did an “egg”cellent job with the tutorial.
Wow, is this impressive! I’ve made chicken coupes with reclaimed lumber, and I’ve seen many little backyard chicken coupes, but never anything as beautiful as this. Very, very well done!
Nice job! I learned Sketchup for the sole purpose of designing our urban chicken coop. It’s such a great program for this type of thing.
Wow! I love it! Any plans on building a rabbit hutch? Thanks for sharing!
Love this coop!! I would appreciate more detailed instructions if you ever decide to get into that much detail. I would build this in a heartbeat!! Thanks for sharing!!
Wow…you did a great job, Scott! Seriously, this is the most beautiful, functional chicken house I have ever seen. I really wish I could have chickens in my community!
This chicken coop is so fancy and pretty! I lived in a farm with some really nice folks for 2 years and they had tons of chickens… like 30 or so. My host mom loves her chickens so much she just kept hatching the eggs. She would even put unhatched eggs left by the momma hens in her breast pocket and walk around with them to keep them warm in the hopes of making them live. So, I never got to eat fresh, farm eggs when I lived there. LOL!
Pretty amazing I just wish you had a shot taken from an angle where we could see where you put the satellite dish on the roof of the “Chick Mahal”. Very cool!
My goodness, this is definitely the Taj Mahal of chicken coopage. Makes my coop seem so 3rd world. 🙂 Lucky chooks!
Thanks for sharing your info. I really appreciate your efforts and I am waiting for your further write ups thank you once again.
Amazing! Well done. Now when can I come over for fresh eggs? 😉
This is a chicken Palace for sure! I am saving it for my men: great step by step instruction!
Wow it turned out amazing!
What lucky hens – this coop looks beautiful! The kiddie rake is a great idea too. I should put one our by our coop.
Do you have a free supply list? or will that be found on your detailed plans?
The supply list is included with the plans, along with a spreadsheet for determining your local cost.
I saw you mentioned that the total cost is about $2000. How much was it approximately for just the coop itself (i.e., not including the tile, concrete, sand, etc., just the structure/roof)? I am trying to get an idea of potential costs before selling my wife on the idea 😉
I would ballpark the figure around $1500. Large expense items are obviously lumber, the metal roof, siding, and fasteners. There are great options to reduce the cost of some of these items and get the cost down. A big one would be to remove the metal roof and use a simple plastic roof option found in your box hardware stores. You could remove the roof sheathing and felt, but I would retain the cross members. Using scrap lumber from construction sites or reclaimed materials stores helps reduce costs further. Also, using cheaper thinner plywood instead of nicer siding will cut the cost of the siding in half. If painted, and with the trim work, it will still look fantastic. I choose the siding because I liked the look of it. Somethings to keep in mind when selling the idea is you want something that will last, stand up to the weather, and something that looks nice if it is visible. We bought a smaller temporary coop for the chicks from a store. While it looked nice, it didn’t last very long and I had concerns the raccoons in our area would quickly find ways to get into it. Best of Luck!